
The Royal Navy by designer Jack Greene published by Quarterdeck Games in 1984 focuses strictly on one dimension of naval warfare—surface combat—by the Royal Navy from the period of World War I to World War II. The game system is heavy on tables, yet flexible, using two different game scales for daylight and night engagements. But please, don’t let that stop you from playing because as thematically focused The Royal Navy is, so is the game play.
Early design
In the early 1980’s designer Jack Greene was something of a naval wargaming phenom. In 1978 he redesigned Bismarck for the Avalon Hill Game Co., taking a relatively simple move & search strategy game and turning it into a more richly detailed wargame. The next year Greene opened their own company, Quarterdeck Games, and quickly released Destroyer Captain (1979) and Ironbottom Sound in 1981. Both games focused on surface naval combat. Ironbottom Sound was widely applauded winning the 1981 Charles S. Roberts Award for Best Initial Release. Come 1984 and Greene was ready to follow-up on the success of Ironbottom Sound with a new naval wargame, this time focused on the Royal Navy of the British Empire.

The Royal Navy describes itself this way:
THE ROYAL NAVY is a tactical game to reproduce many of the small naval actions of World War I and II fought by the British Empire. Players will note that THE ROYAL NAVY (RN) is based on both IRONBOTTOM SOUND and DESTROYER CAPTAIN and is the design culmination of both those games. Most of the tactical battles will concern only a few ships on either side, while two scenarios (the 2nd Battle of the Sirte and Harpoon Convoy) are primarily multi-player battles.
1.0 INTRODUCTION
I could try to describe how game play works in The Royal Navy but instead I will quote rule 2.0 SYNOPSIS OF PLAY in its entirety as it a better description than I could give:
RN is played in turns in which sequential movement is employed in the basic game. The optional game rules use movement that is secretly plotted by both players and then revealed. This allows for an element of simultaneous movement. Torpedoes are secretly aimed at specific ships and this information is recorded. During ship movement execution phase, it will be determined if any hits are achieved. Gunnery combat consists of firing guns at a specific ship. This will take place after all movement. Gunnery hits are then evaluated, using the dice. Torpedo hits and damage are now calculated. The entire combat procedure is a mathematical method of determining what is fired or launched form one ship, and what hits or misses the target ship. The dice have nothing to do with movement! The dice are only used to represent a range of possible outcomes reflecting the uncertainties of real combat. Expenditure of torpedoes, as well as any damage incurred, is recorded on the ship’s “log”. The ships log lists important characteristics of each ship in play and is filled out by each player at the beginning of each scenario. These logs are tally sheets of a ship’s condition as play proceeds from turn to turn. The time and movement scales for daylight versus night actions are radically different. Each scenario will explain which system to use.
2.0 SYNOPSIS OF PLAY, p. 1
Notice that The Royal Navy has rules for torpedoes and gunnery but no rules for aircraft or submarines. No matter how much one looks for those rules they will never find them because The Royal Navy is concerned with surface combat and only surface combat. There is no “over” or “under” the sea in The Royal Navy but just one dimension “on” the ocean waves.
One dimension but two scales
While The Royal Navy covers a single dimension of naval warfare—surface combat—it does so using two game scales: one for day and another for night. As the rules tell us:
Each hex represents 600 yards for night actions and 1500 yards for daylight actions. Each turn represents 3 minutes of real time in night actions and 7.5 minutes for day battles. The game scale is not a straight doubling of scale because, on the average, friendly ships tend to sail closer to each other at night and further apart during daylight.
3.1 THE MAPBOARD, p. 2
While there are different rules in The Royal Navy for daylight and night turns, moving between the two scales is actually rather easy. The key difference is found in rule 8.6: “The most important difference between night and day actions is that in a day action you fire all your guns twice in the gunnery phase while at night you fire but once” (emphasis in original, The Royal Navy, p.7). The near-doubling of time and hex size in day turns makes conversion between day and night turns transparent to players as the factors of individual ships need not be changed.
Player aid thyself
Looking at today’s lavishly produced wargames with hundreds of counters, mounted map sheets, and volumes of printed matter on card stock or glossy paper, it is easy to denigrate older games that don’t have the same “Gucci” production standards. When considered against its contemporaries, The Royal Navy was what I consider average to slightly above average production quality. The game came in a bookshelf ready box, much like many Avalon Hill Game Co. designs of the day. The rule book was obviously type set by non-professionals—think a slightly refined desktop publishing approach. The map board was of good quality heavy paper with clean, crisp lines and good color register. The counters were again laid out but on good die-cut material.
The components of The Royal Navy, however, also show some of the production limits of its day. In particular are the Ship Scenario Information (SSI) sheets and the Ship’s Log.

For every ship it is up to the players in The Royal Navy to transfer the information from the SSI to a Ship’s Log for the game. Given that 1984 was the early days of home computing, I am sure some intrepid players made their own ready-to-print files. For most others getting log sheets ready was simply called “pre-game” work.
Charting fear
At first glance, the player aids for The Royal Navy look quite daunting. There are eight (8) charts and tables spread over two 11″x 17″ single-sided and two 8.5″ x 11″ double-sided player aids. While most are just tables, perhaps the most intimidating is the Armor Penetration Table (#1) with its squiggly lines on a graph.

In use, however, the game play in The Royal Navy is actually rather simple and logically moves from table to table. For example, lets look at how the game plays out a gunnery action from a 1934 Royal Navy exercise where a Blue battleship (HMS Rodney) is surprised by a Red battleship (HMS Queen Elizabeth, Warspite-class) firing a full broadside at night at a range of 7,000 yards (10 hexes) while being illuminated by a starshell.
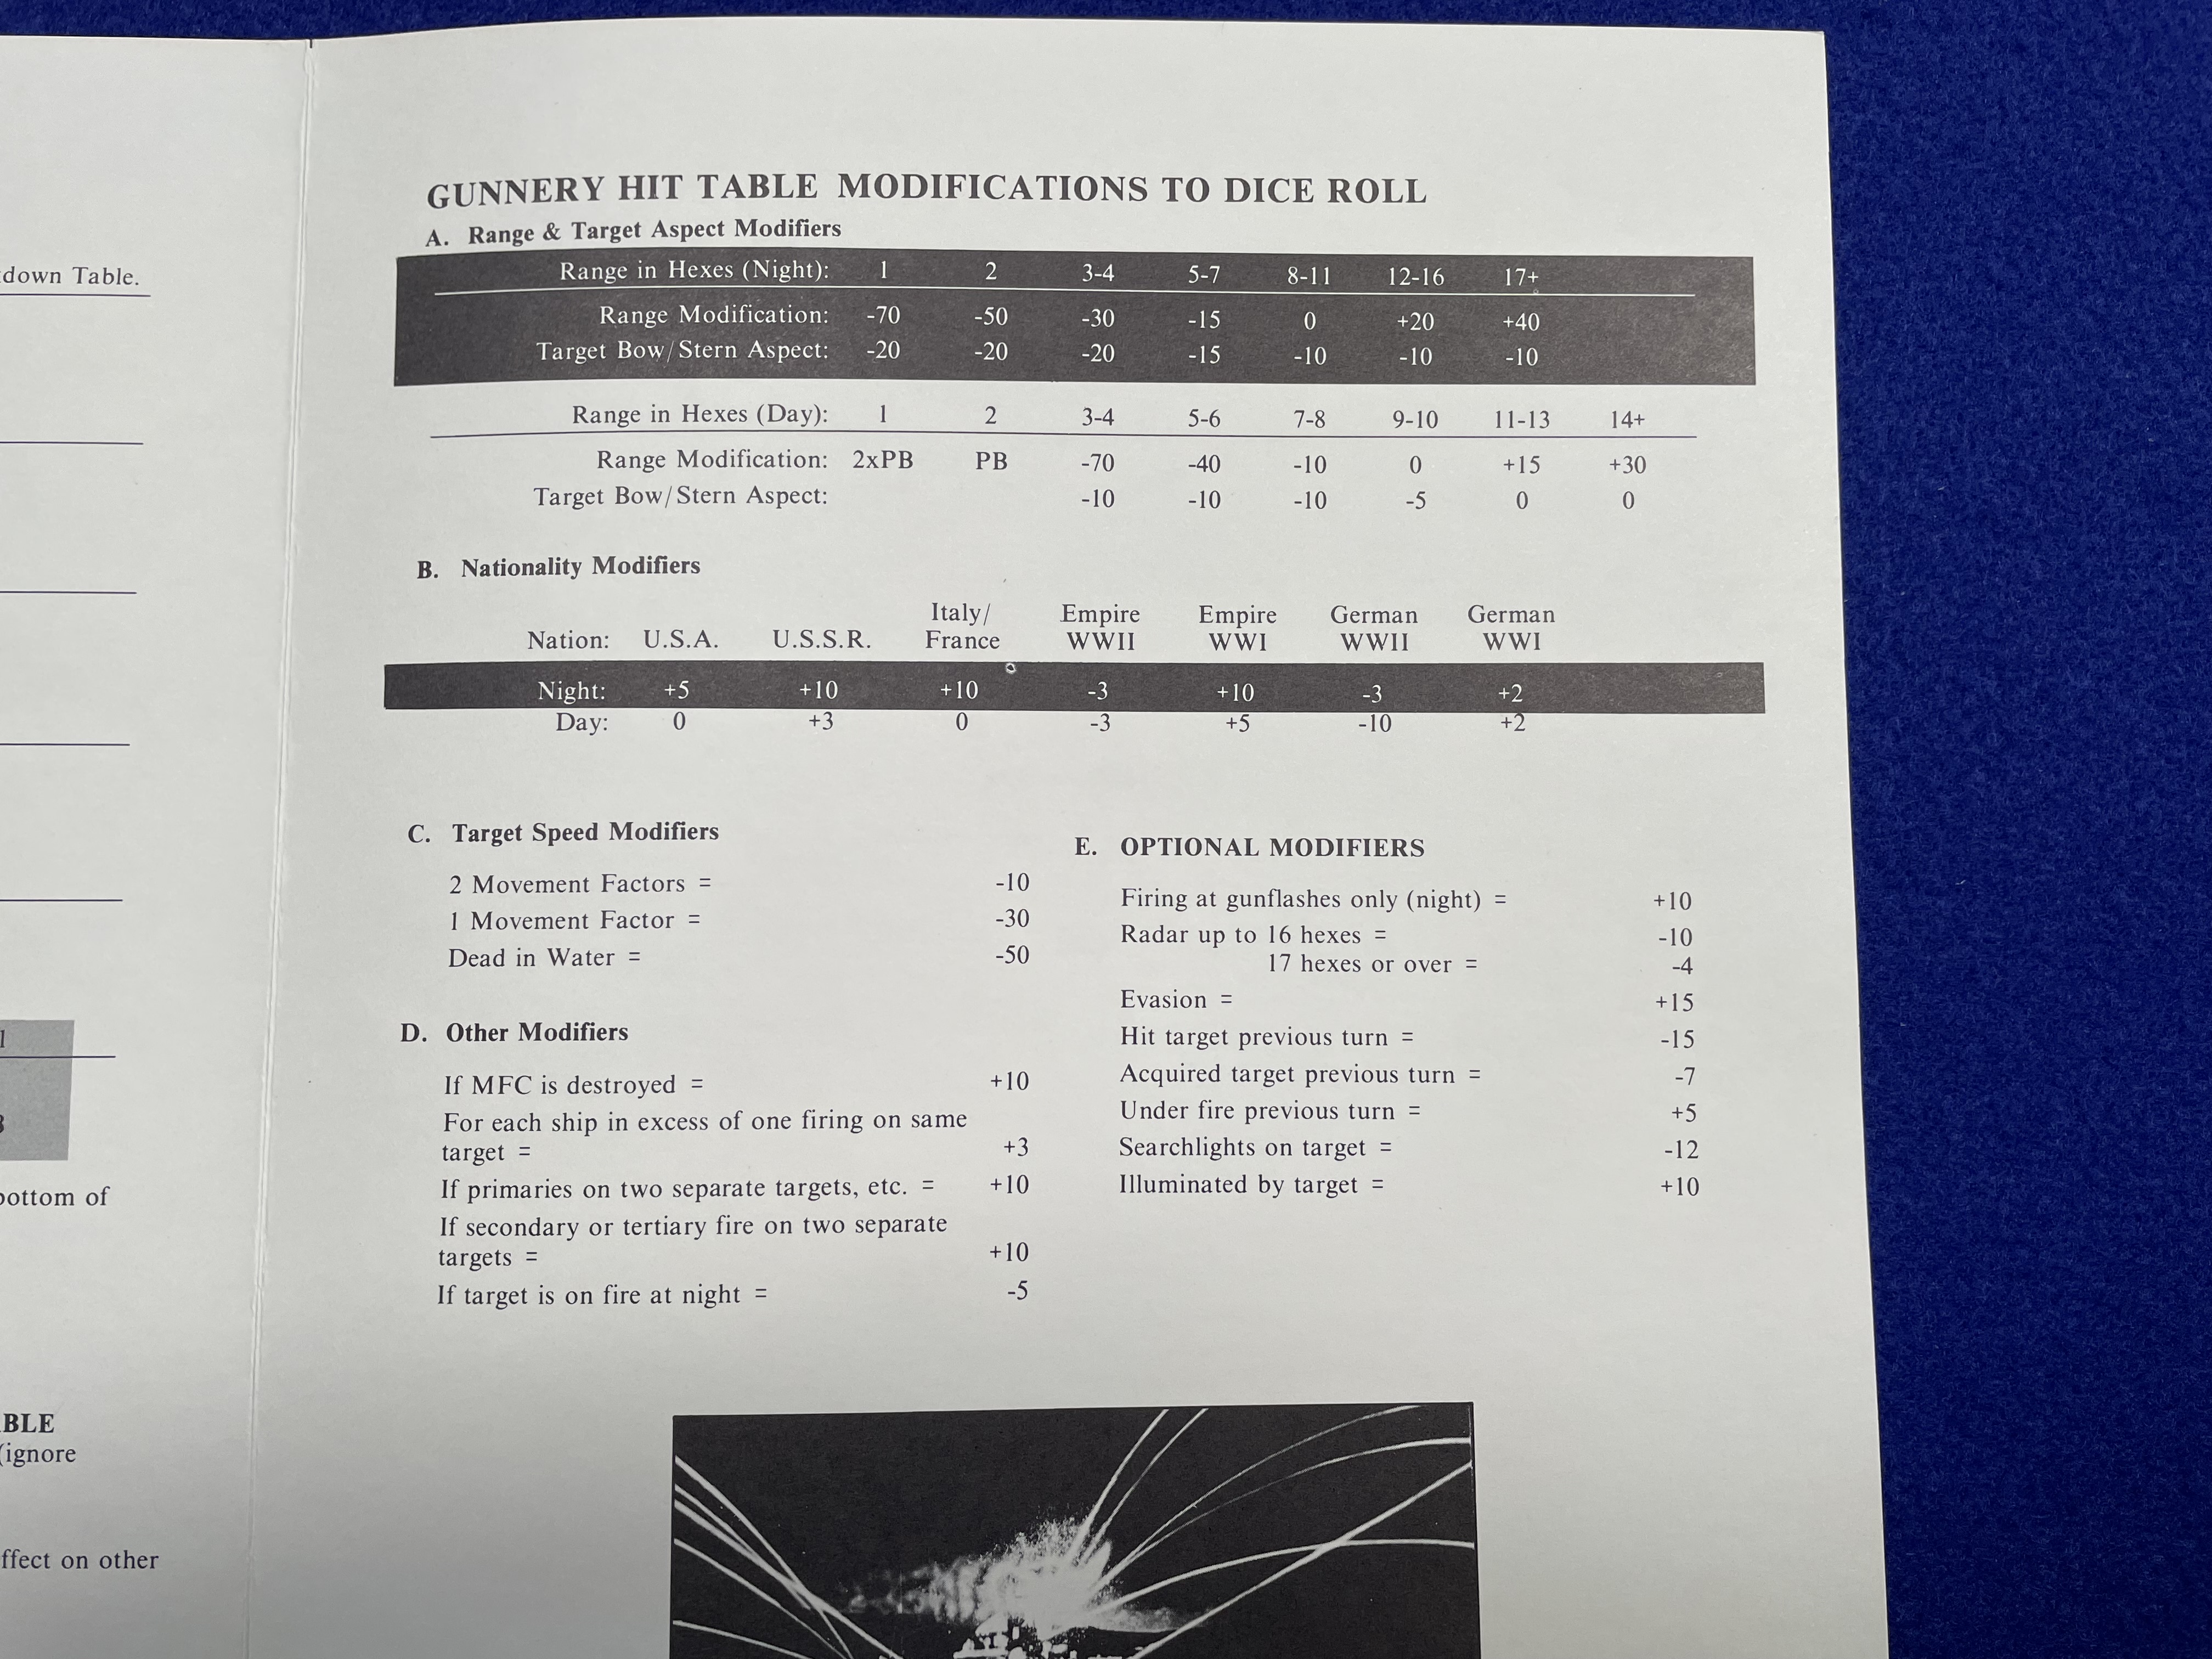
Starting with Gunnery Hit Table #3, we roll d100 and look to the Gunnery Hit Table Modifications to Dice Roll and see that…
- Night Range Modification = 0
- Target Bow/Stern Aspect (YES) = -10
- Nationality Modification (Empire WWII) = -10
- Target Speed (2MF) = -10
- Acquired target previous turn = -7
- (Total Modifier = -37)
The firing player then rolls d100 [38] and modify -37 for a final roll of 01.Using Gunnery Hit Table (#3) cross reference 68 Primary Gunfire Factors with a roll of 01 to get 7 Hits resulting.
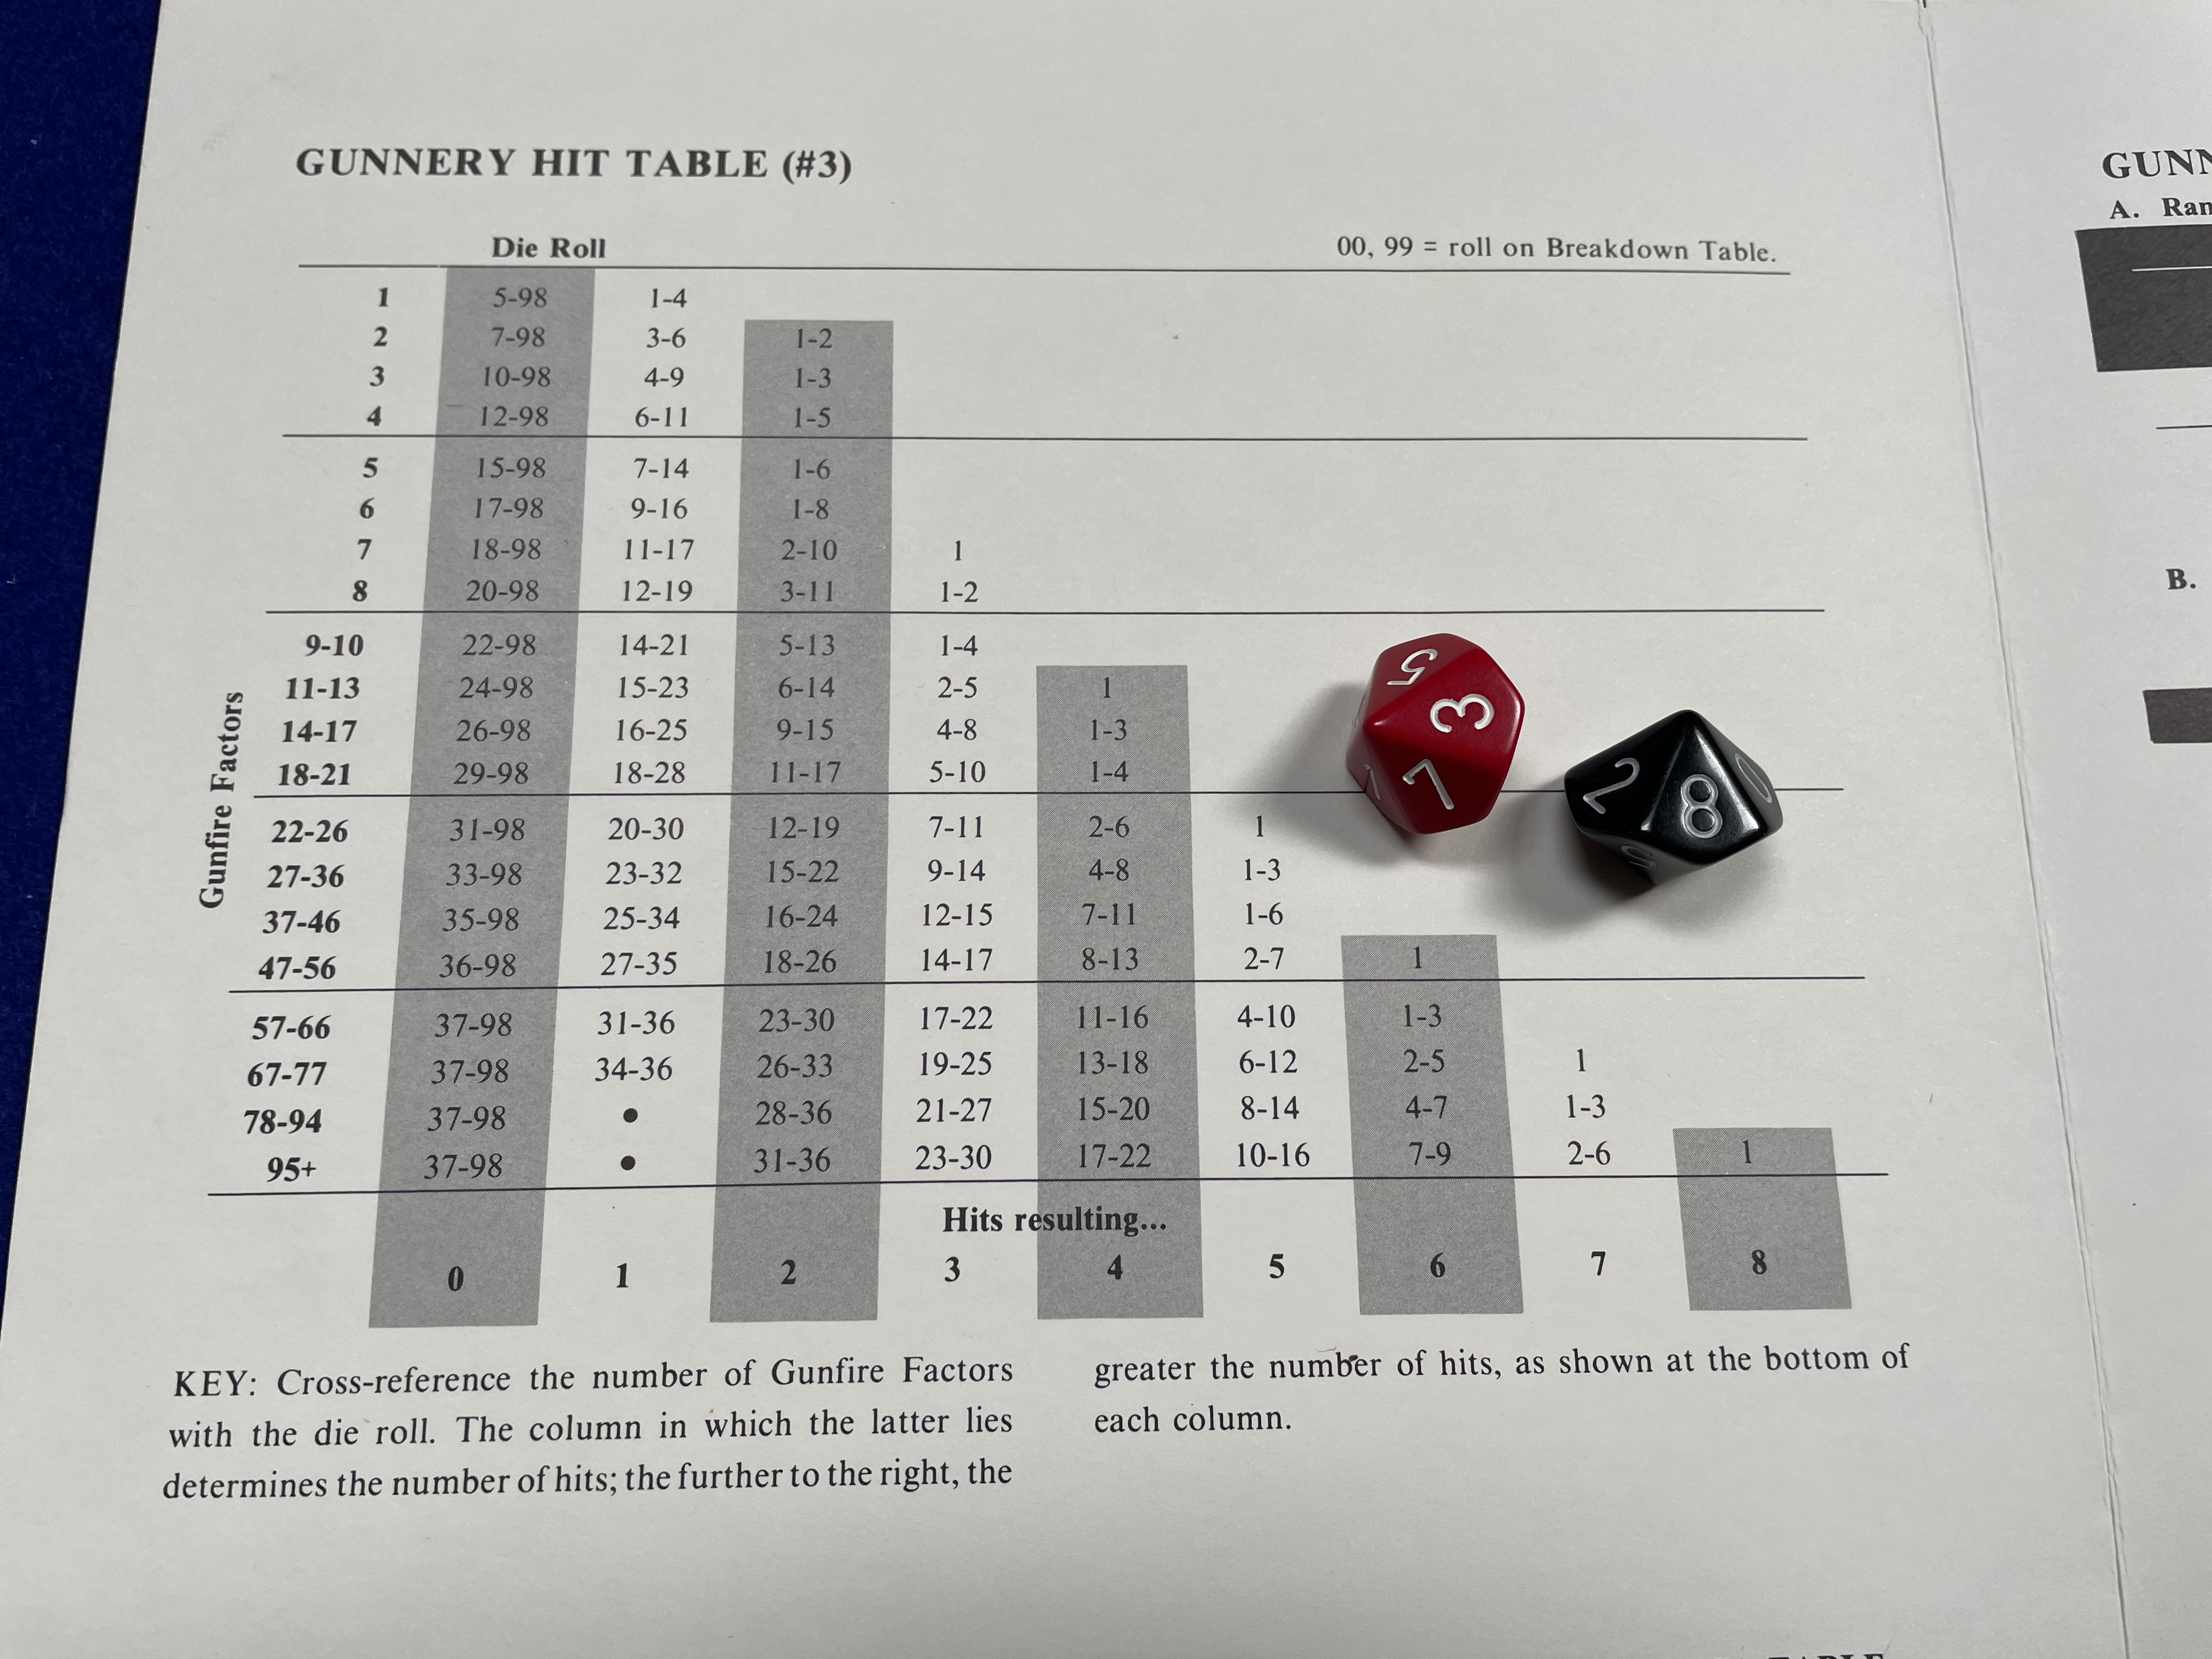
Moving to Gunnery Hit Results Table (#4) roll d100 for each hit:
Hit 1 = [23] for “@ Bow Primary.” The @ requires determination of armor penetration. Using Armor Penetration Table (#1) go across the bottom to 15 and find the “Brit 15″ which is actually at 14. Tracing that line up to the Night 10 hexes range crossing is the result is 15″ meaning the target must have less than 15” of Primary Armor to penetrate; per the SSI Rodney has 16″ Primary Armor so the hit does not penetrate.


Hit 2 = [15] for “Special Damage.” Roll d100 on Special Damage Table (#5) = [44] for “@ Belt Hit, 2 Hull, 2 Primary, 1 Secondary, Capt/Adm dead.” Rodney Belt Armor is 14″ so the hit penetrates; all the damage marked off the Ship’s Log.

Hit 3 = [39] for @ Primary…no penetration.
Hit 4 = [92] for 2 Hull (15 remaining) and 2 M meaning speed 4-4-3 now 3-3-3.
Hit 5 = [16] Special Damage. Roll d100 for [50] @ Belt; penetrates for “All guns cease fire for one turn.”
Hit 6 = [65] for “MFC” or Main Fire Control destroyed with a +10 on any future gunnery rolls for Rodney.
Hit 7 = [30] for “@ Bow Primary” with no penetration.
Narratively speaking, HMS Rodney is smothered in gunfire with some rounds being shrugged off (hits 1, 3, and 7) but others destroying the Main Gunner Director (hit 5) and another causing some hull damage with flooding (hit 4). Another hit likely knocked out electrical power (hit 5) which lead to loss of power to the turrets. The most devastating hit (hit 2), however, blew through the belt armor and disabled two of Rodney’s three primary turrets and the secondary 6″ guns as well as killing the Captain and generally weakening hull integrity. HMS Rodney is effectively out of the battle. This approximates the historical ruling by exercise umpires (see more below).
While the gunfire resolution process might sound a bit tedious (I can hear the complaints of “Oh no, so many tables. Run away!”) I usually find that wargamers work together to make the process go by faster. Once the number of hits is determined, the firing player rolls for the hits, and calls out the damage to the other player who has their Ship’s Log in front of them. The first few @ armor penetration hits may require a look up but once those numbers are known for this round of firing the resolution goes fast.
HMS Flexible
Designer Jack Greene calls The Royal Navy “a flexible game. When saying so, Greene clearly has three criteria in mind:
- Scenarios are balanced.
- Optional rules let players pick their complexity.
- Players can design their own scenarios.
RN has been designed to be a flexible game. The scenarios are for the most part quite balanced (which is why a battle like Matapan is absent). The optional rules are present to give more realism but go hand-in-hand with more complexity. I am a strong believer in letting the gamer pick the level of complexity desired.
1.0 INTRODUCTION, p. 1
The presence of balanced scenarios in The Royal Navy can be seen both a blessing and a curse. For players who are of a more competitive bent, a balanced scenario that provides a relatively equal chance of either side winning is welcome. On the other hand, some players may like unbalanced scenarios that pit an obvious underdog against a “sure winner” if for no other reason than to see if they can “snatch victory from the jaws of defeat.”
The Royal Navy offers nine optional rules in rules section 10.0 OPTIONAL RULES. The nine optional rules are what the designer offers to players as their tool kit to make the game as complex—or not—as they like. Looking at the nine optional rules one likely discovers that some of these rules are “less optional” than others.
10.1 Simultaneous Movement. This is perhaps the optional rule that adds the most complexity in The Royal Navy because it calls for movement plots which add playing time. ACCEPTABLE but not necessary for me.
10.2 Torpedos as Ships. In this rule torpedoes move on the map board like a small ship. This rule actually lessens complexity as players now fire in the direction of a ship and damage is resolved only if torpedoes intersect a target. ACCEPTABLE and NECESSARY for me.
10.3 SPECIAL NIGHT COMBAT MODIFIERS. I argue these “optional rules” are mandatory as night combat is the heart of the game design. No individual rule is that complex and even using all of them together adds little complexity to play. The special night rules cover topics such as:
- Radar (10.31).
- Firing at gun flashes (10.32).
- Searchlights (10.33).
- Starshells (10.34).
- Burning ships silhouetting targets (10.35).
10.4 Broadsides. This rule attempts to rectify an artificial condition that IGo-UGo movement creates that allows ships to fire broadsides (or partial broadsides) even if the ship ends movement bow- or stern-on to a target. Again, not a very complex rule to implement. ACCEPTABLE and NECESSARY for me.
10.5 Smokescreens. Smokescreens can be laid during daylight or night turns. A smokescreen blocks line of sight. ACCEPTABLE but not necessary for me.
10.6 AA Guns. This rule designates certain smaller guns, when in a secondary or tertiary battery, as not usable in combat for WW II scenarios because it would be dedicated to air defense. ACCEPTABLE for me…I guess?
10.7 Secret Damage. Self explanatory. ACCEPTABLE and necessary for me.
10.8 Natural [disaster]. If on a to hit roll a natural 00 or 99 is rolled the firing ship must roll on the Breakdown Table. ACCEPTABLE for me.
10.9 Evasion. This rule covers evasive maneuvering. ACCEPTABLE for me.
The scenarios in The Royal Navy are but a start to the many possible battles that can be played. There are thirteen (13) scenarios in The Royal Navy. The breakdown of the scenarios between World War I and the Second World War and the number of daylight versus night actions tells us much about the designer’s focus:
- Of the 13 scenarios, five (5) are WWI and eight (8) are World War II.
- Nine (9) scenarios are daylight actions and four (4) are night engagements.
- In nine (9) scenarios the Royal Navy is opposed by the Germans; in three (3) scenarios the enemy is Italy and in a single scenario the enemy is Vichy France.
If the 13 scenarios in The Royal Navy are not enough players can design their own scenarios using the ship counters and Ship’s Logs for Great Britain and Australia, Germany, Italy, France, the United States, the Soviet Union, and even Poland. The limitation, if any, is the number of counters and if an SSI for the ship class in question is available. Though not stated, the tone of the game and Designer Notes implies that players are more than welcome, perhaps even challenged, to make their own SSIs.
[Interlude – Janes and Conways]
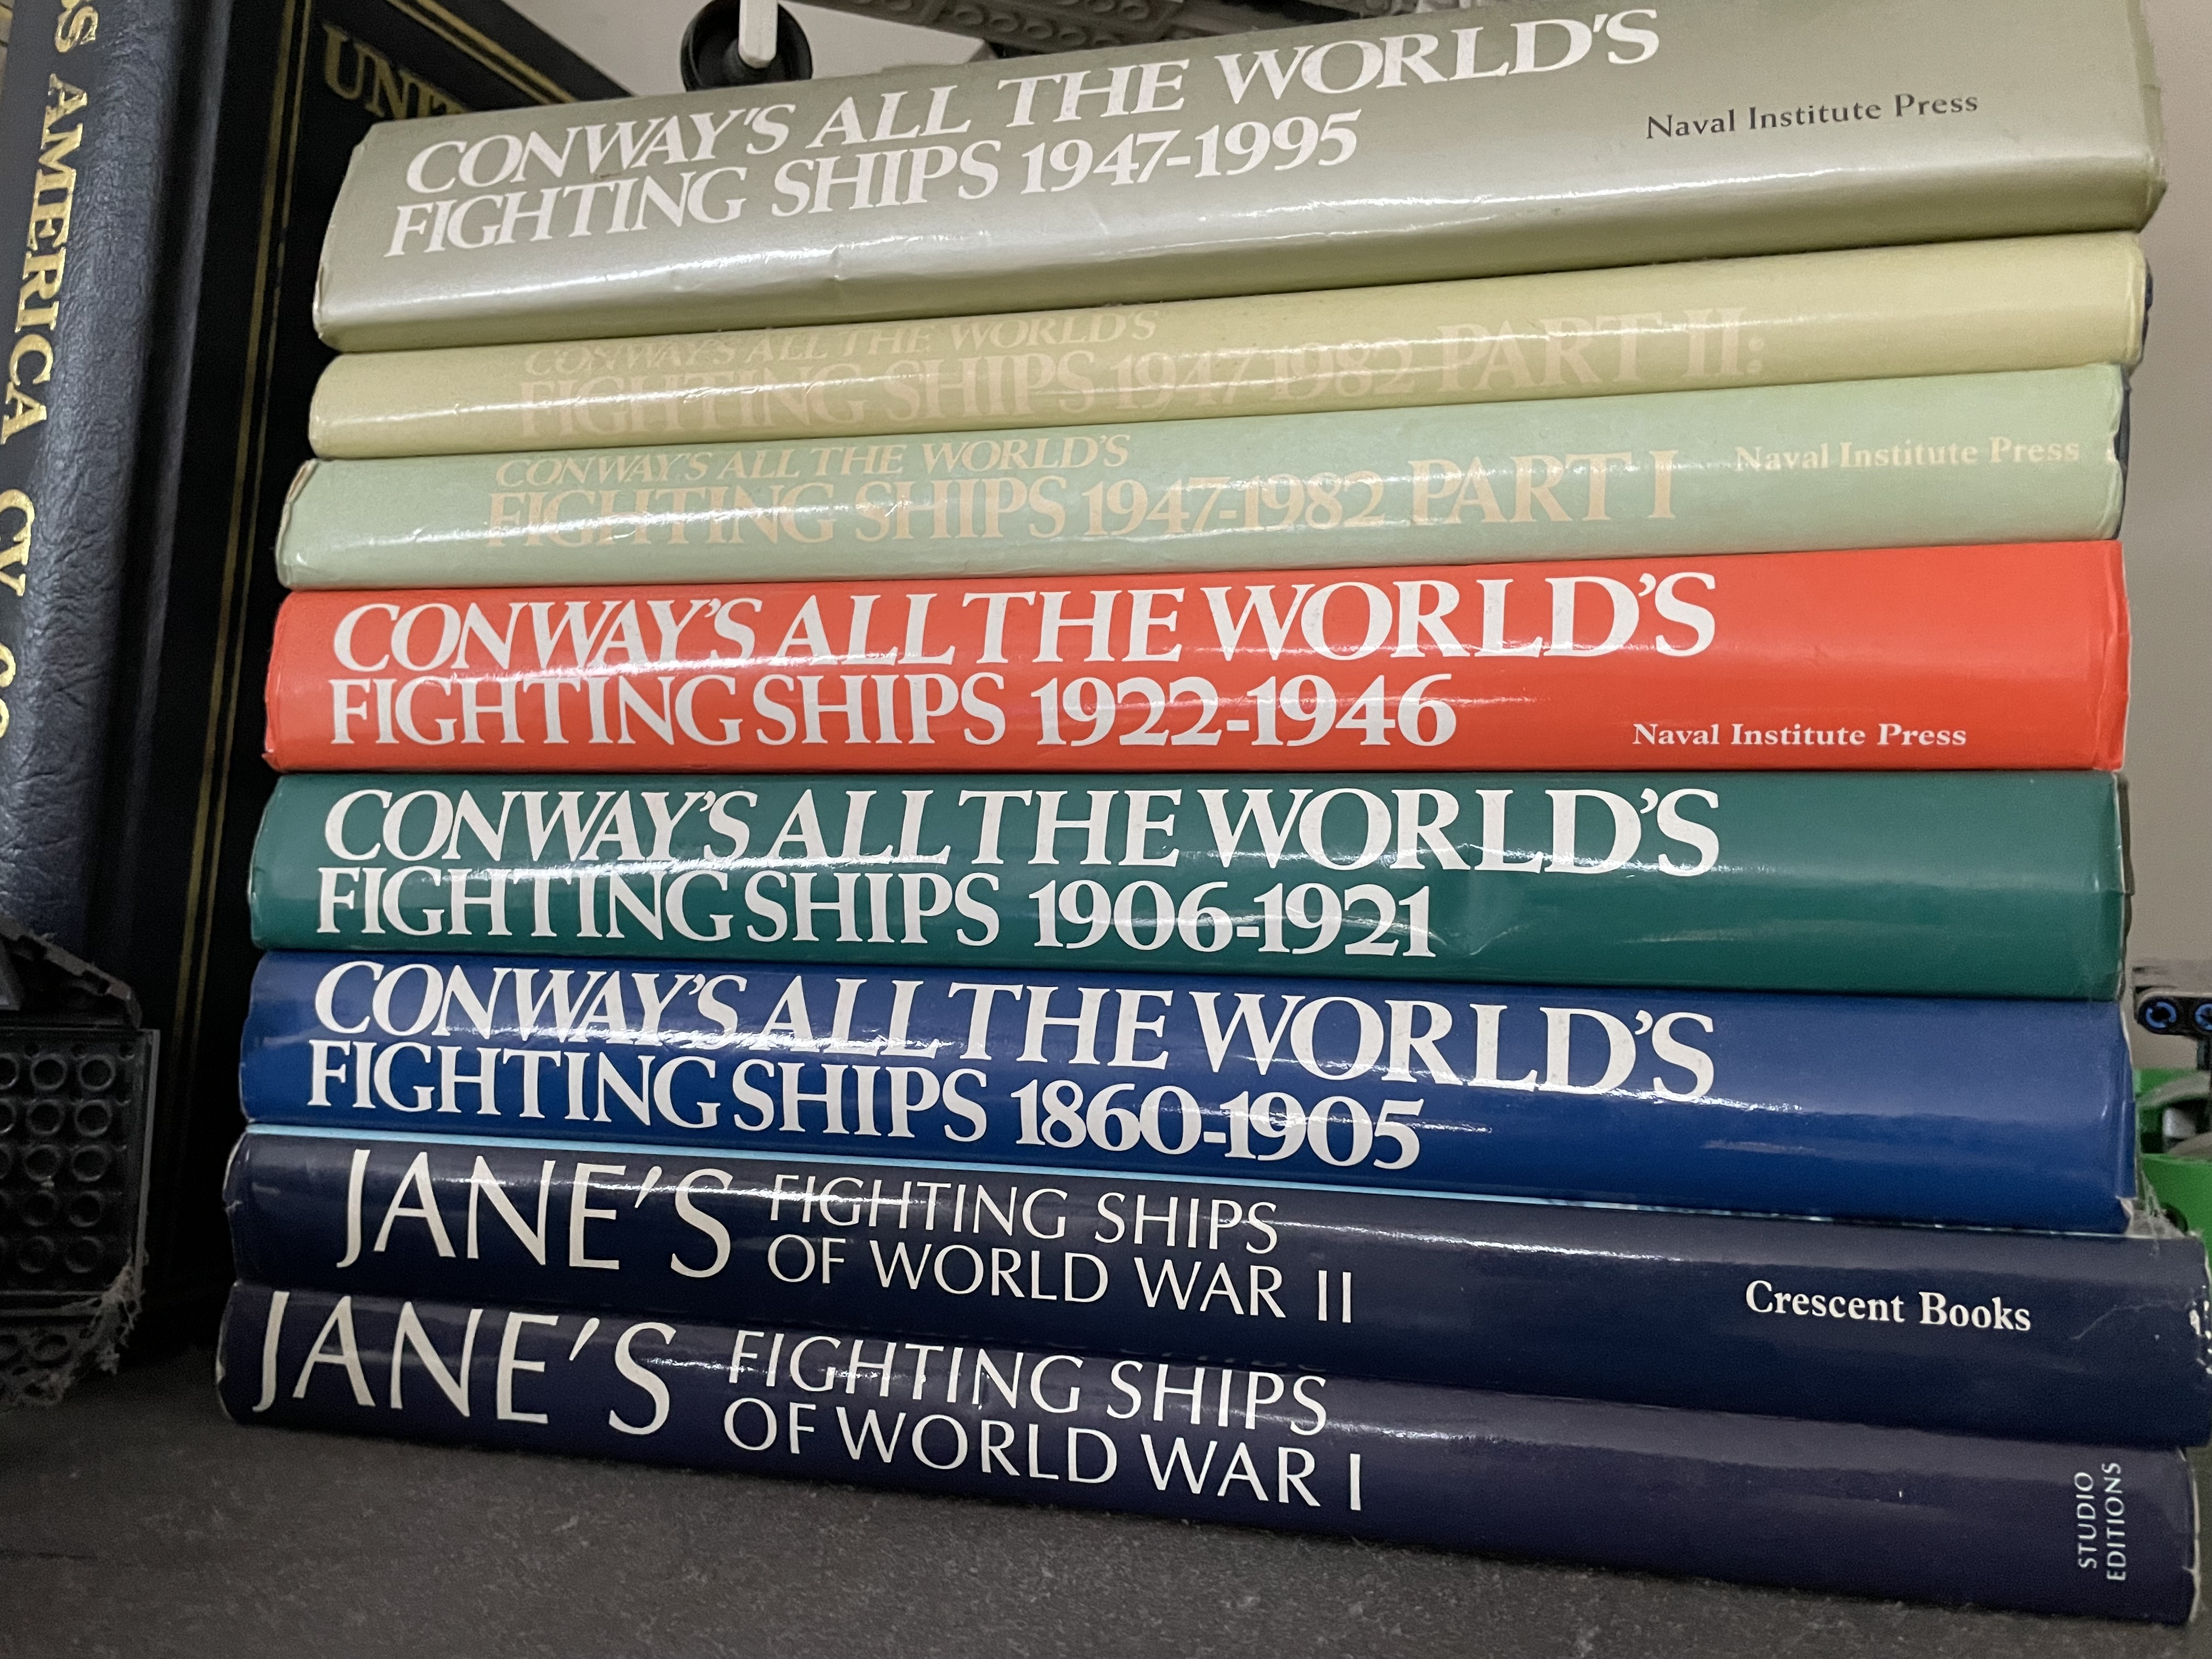
[In today’s electronic information age, gamers are spoiled with ready access to characteristics and performance data of historical warships being just a few keystrokes away. Back in the pre-internet age, like when I was a middle school wargamer, the “warship wiki” of the day was the school library copy of Jane’s Fighting Ships. My middle school had a single copy that my group of fellow wargamers and I shared. We had an agreement that one person would check out the book on Friday for our games over the weekend and return it Monday morning. Nobody could check it out during the week so we all could use it for “research” during lunch or library time those days. We were very upset during the school year when history projects or papers were due because, inevitably, some darn non-wargamer would check out the book for the full two-week period and keep it away from us. For myself and my wargaming friends, the problem was eventually solved when we were in high school and I discovered sets of Janes and Conways in a military bookstore in Denver. I saved a ton of money and blew it all on those collections but it was well worth it. Those books—and many more—still sit on my shelves today.]
Visible gaming
Perhaps the most flexible—and least recognized—game mechanism in The Royal Navy is visibility. While an SSI in The Royal Navy gives maximum gunnery ranges (in daylight hexes) the real limiting factor in combat is visibility. The visibility rules for The Royal Navy actually follow a special rules section on limited gunnery ranges for small guns (6″ or less) during night actions. Buried in the last of three paragraphs of rule 9.11 is the following key game mechanism:
A target is visible if it is (a) within visibility range as given in the scenario information, or (b) if it is a night action and the target is on fire or illuminated. If the enemy ship is visible and the guns bear, one may fire on such a target.
9.1 GUNNERY COMBAT / 9.11, p. 7
Note the simple rules approach: if you can see it you can shoot it. The range of the guns is not as important as seeing the target.
White Ensign in darkness
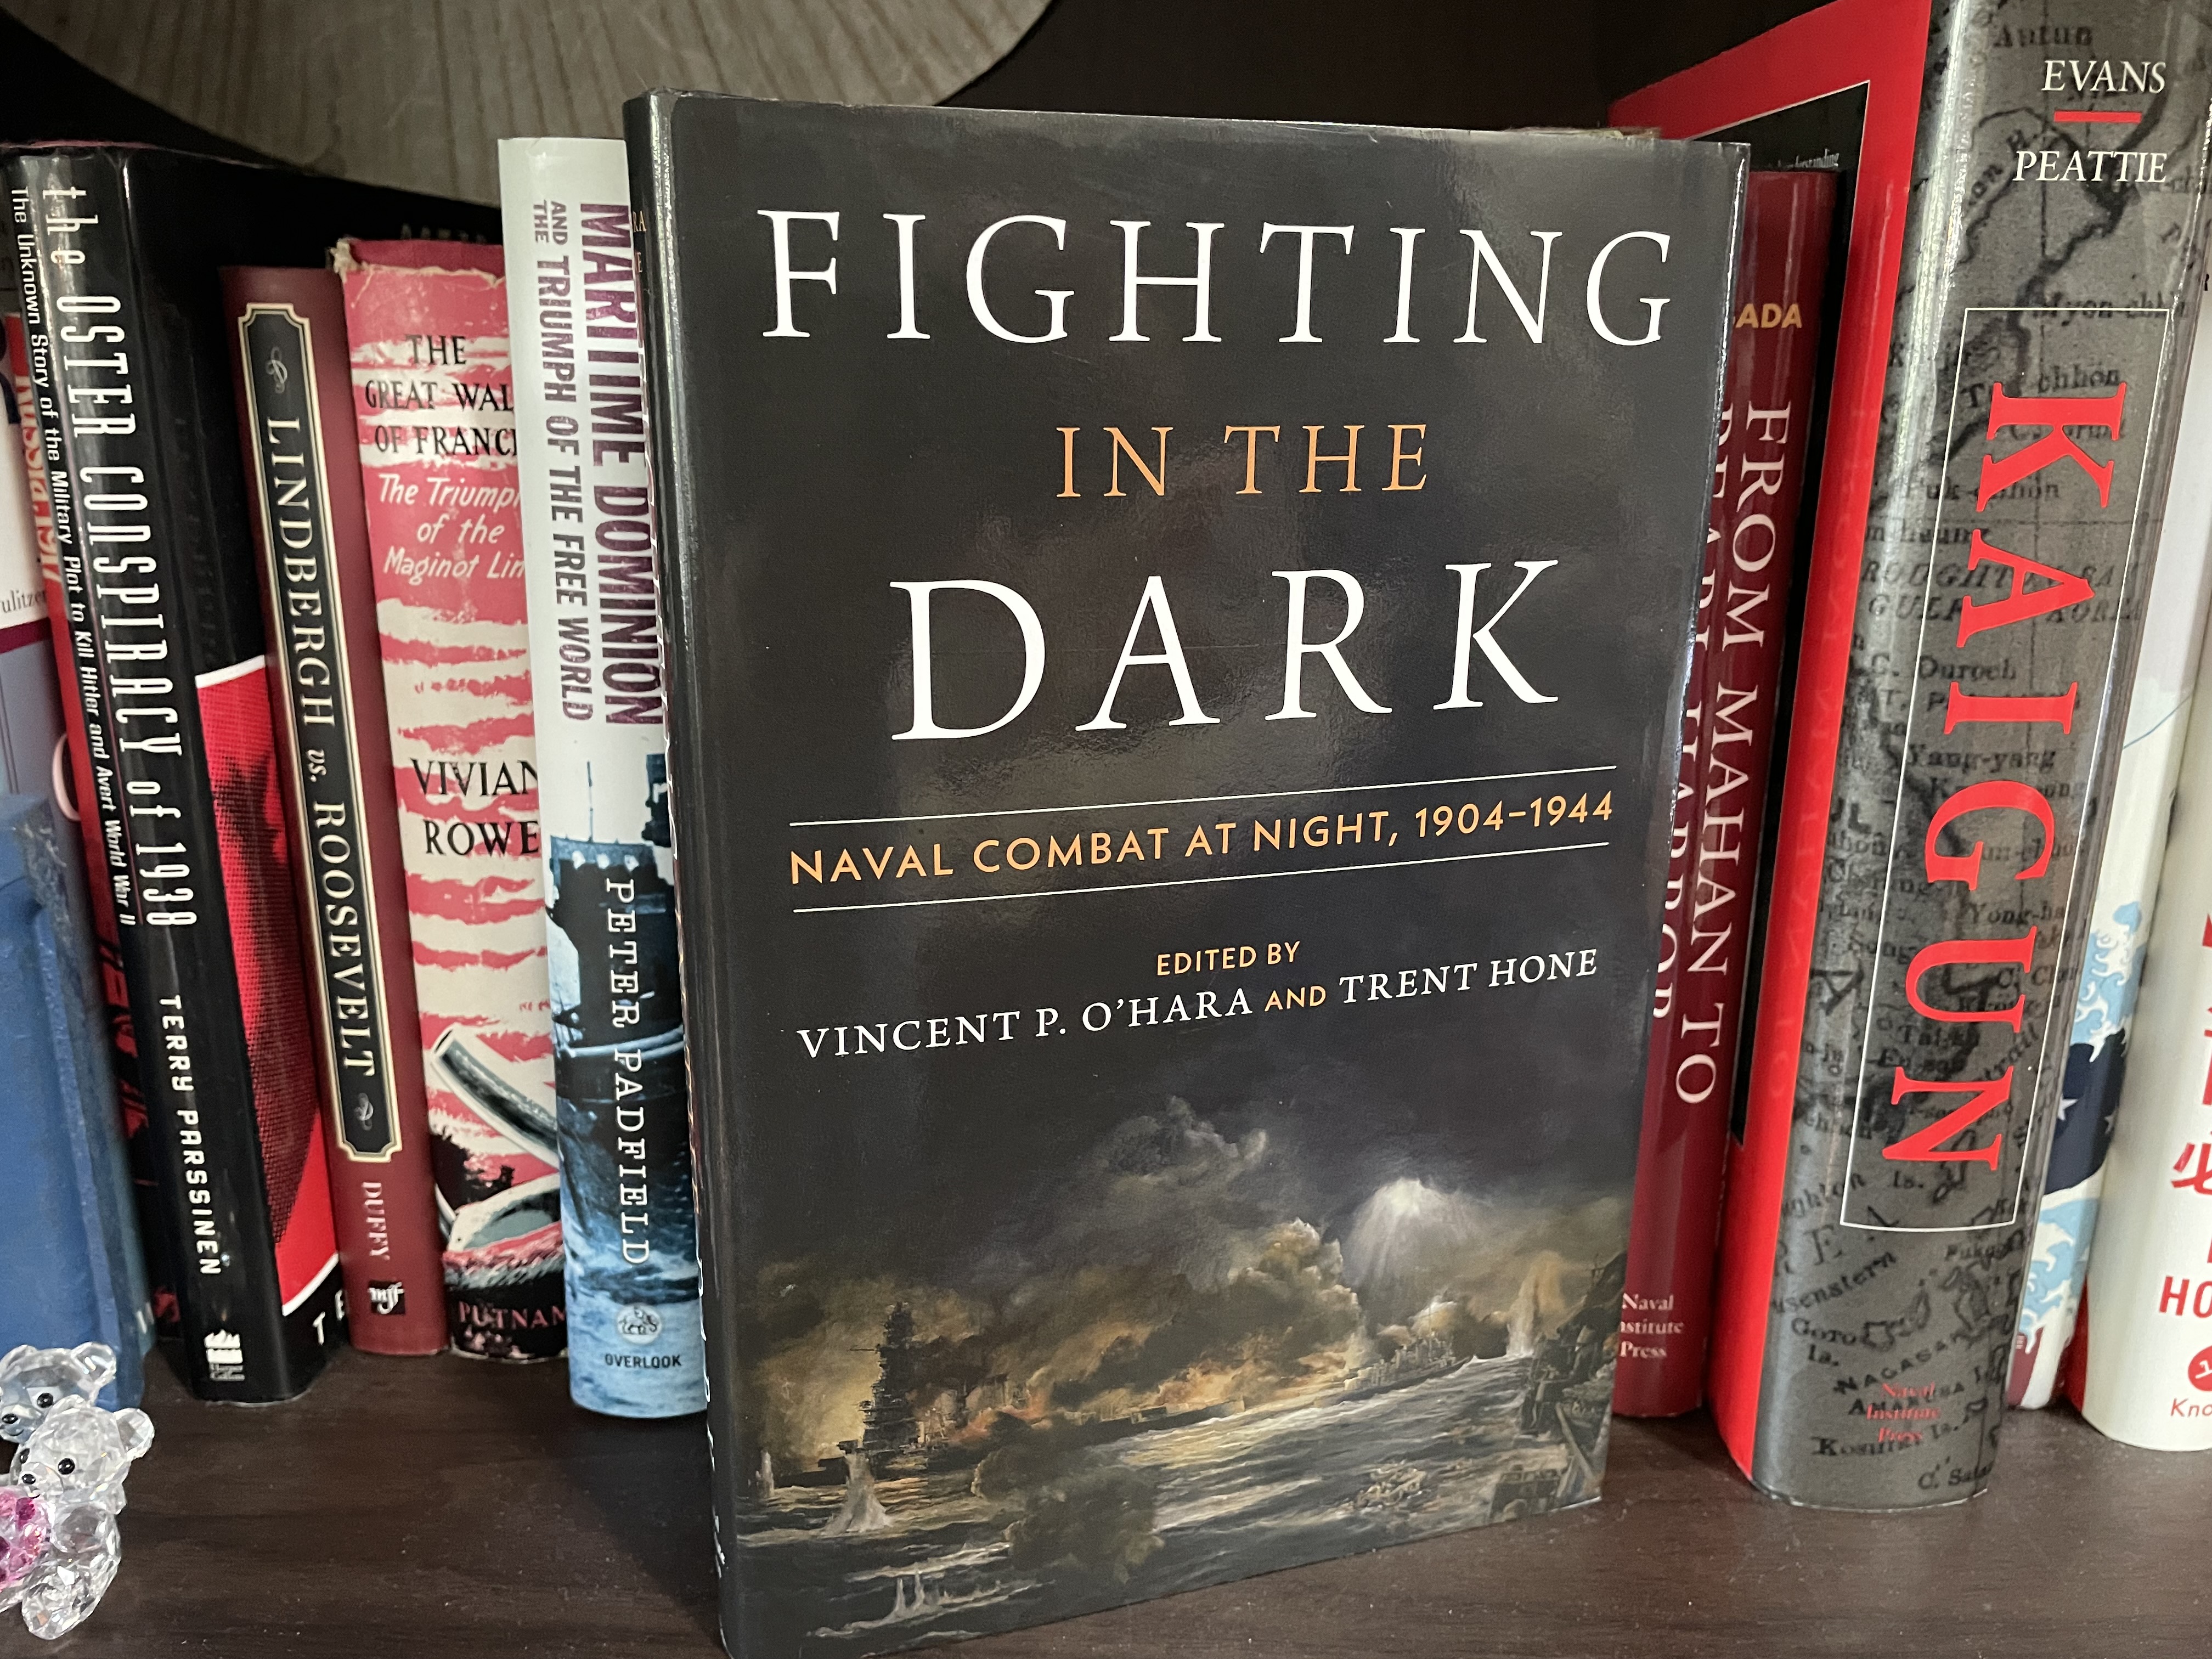
While exploring the rules of The Royal Navy I went in search of historical material that I could read and maybe turn into a scenario. Fighting in the Dark: Naval Combat at Night, 1904-1944 edited by Vincent P. O’Hara and Trent Hone includes a chapter written by Rear Admiral James Goldrick (Ret.) of the Royal Australian Navy titled, “The British and Night Fighting At and Over the Sea, 1916-1939” in which the author traces the development of British night-fighting doctrine from the Battle of Jutland in 1916 up to just before the advent of an effective surface search radar which happened not long after World War II started in 1939.
Goldrick points out that in the years leading up to the Second World War the Royal Navy preferred night engagements though budget and training often prevented full realization of that doctrine. The adoption of a night fighting attitude in the Royal Navy was most evident in 1934 when Admiral Ernle Chatfield was First Sea Lord. Goldrick points to the Combined Fleet maneuvers of March 1934 which were, “the most public demonstration of the Royal Navy’s changed approach to night fighting and its success in developing tactics to meet its demands” (O’Hara & Hone, p. 96). The culminating battle of the 1934 Combined Fleet Maneuvers was seemingly destined to one day be rendered as a scenario for The Royal Navy.
Broadly speaking, the Combined Fleet maneuvers of 1934 called for the Blue (Home) fleet to cover a convoy from England destined for a port on the Iberian Peninsula. The Red (Mediterranean) fleet, led by Admiral Fisher (a strong proponent of night combat) was to intercept and destroy the convoy. The Blue fleet commander assigned the battle cruisers, aircraft carrier, and supporting units to act as a decoy force while the battleships escorted the convoy. Fisher used the Red fleet’s cruisers and destroyers to form a mobile barrier across the possible avenues of approach of Blue. Fisher did not depend on the air arm which was a sound decision because, “The two fleets encountered an Atlantic depression that manifested itself as a ‘full gale from the north and west'” making flying operations impossible (O’Hara & Hone, p. 98). Renown, a Blue battle cruiser, had part of a torpedo bulge torn away. The older Blue fleet destroyers had to return to port while the Red destroyers forged ahead even as some suffered cracking and structural strains. A lucky sighting by a Red cruiser tipped Fisher’s battleships (Queen Elizabeth, Royal Oak, Resolution, Revenge, and Royal Sovereign) to the location of the Blue convoy and battleships (Nelson, Rodney, Valiant, Malaya, and Barham). Red closed on Blue in the dark even as the Blue commander believed the Red fleet to be at least a hundred miles away. Goldrick describes the culminating battle this way:
With his battleships deployed on a line-of-bearing to keep their “A” arcs open, Fisher closed on the Blue forces until, at a range of just under seven thousand yards, he ordered simultaneous illumination by starshell and searchlight. The effect was devastating, and there was never any doubt on either side that Fisher would have achieved the complete destruction of the Blue main body with little loss.
O’Hara & Hone, p. 100

The Combined Fleet Maneuvers of 1934
A possible scenario set up for The Royal Navy may look like like this:
Blue Fleet – Admiral William Boyle on board HMS Nelson (use Rodney) J-10; HMS Rodney H13, HMS Barham (use Warspite) G7, HMS Malaya (use Warspite) D8, HMS Valiant (use Warspite) F11; All heading in direction 3 at 3 MFs [Movement Factors].
Red Fleet – Admiral Fisher (-3) on board HMS Queen Elizabeth (use Warspite) W29, HMS Royal Oak (use Ramilles) V30, HMS Resolution (use Ramilles) U30, HMS Revenge (use Ramilles) T31, HMS Royal Sovereign (use Ramilles) S31; All heading in direction 5 at 4 MFs.
Visibility is 12 hexes, this is a night action lasting 8 turns. North is direction 1.
Special conditions are that the Blue fleet is not expecting an imminent encounter. The Blue fleet cannot fire on the turn an enemy fleet is sighted or if fired upon. The next turn after sighting or being fired upon the Blue fleet can fire at half firepower (round down). On the third turn after sighting enemy fleet or being fired upon these restrictions on the Blue fleet are lifted.
VICTORY CONDITIONS: Victory is strictly based on victory points.
Flexibility without complexity
The one dimensional combat in The Royal Navy leads to a generally simple game system with only moderate complexity…at best. Jack Greene sought to design a flexible game system in The Royal Navy and generally achieved that objective. In particular, the simple night combat rules are worthy of admiration. It is then perhaps unfortunate that the bulk of the scenarios provided fail to showcase what I argue are the best part of the rules—those night battle rules.
References:
O’Hara, V. P., & Hone, T. (Eds.). (2023). Fighting in the Dark: Naval Combat at Night: 1904-1944. Naval Institute Press.
Feature image courtesy RMN
The opinions and views expressed in this blog are those of the author alone and are presented in a personal capacity. They do not necessarily represent the views of U.S. Navy or any other U.S. government Department, Agency, Office, or employer.
RockyMountainNavy.com © 2007-2024 by Ian B is licensed under CC BY-SA 4.0 ![]()

1 thought on “Wargame SITREP 24-20 ~ One dimension surface tables for the dark in The Royal Navy (Jack Greene, Quarteredeck Games, 1984)”