
The Pacific War: Deadly Bloody Battles of Combined Fleet is a great wargame. This small footprint wargame with easy to learn rules covers the entire Pacific War in World War II with an elegant game system that provides meaningful choices for players and creates a plausible game narrative that is believable. Of the 27 wargames I acquired thus far this year, The Pacific War is a very strong candidate at the moment for my Wargame of the Year.
The Pacific War: Deadly Bloody Battles of Combined Fleet by designer Yoshio Kubota (@YoshioKubota on X) first appeared as a magazine game in Banzai Nr. 12 in February 2022. Bonsai Games updated The Pacific War and re-released it as a folio wargame in 2025. Thanks to publisher Yasushi Nakaguro (@yasN2010 on X) from Bonsai Games a copy of The Pacific War landed on my gaming table. After translating the rules primarily using ChatGPT (which continues to get better at translating wargame rules) I got The Pacific War to my gaming table.
Folded wargame
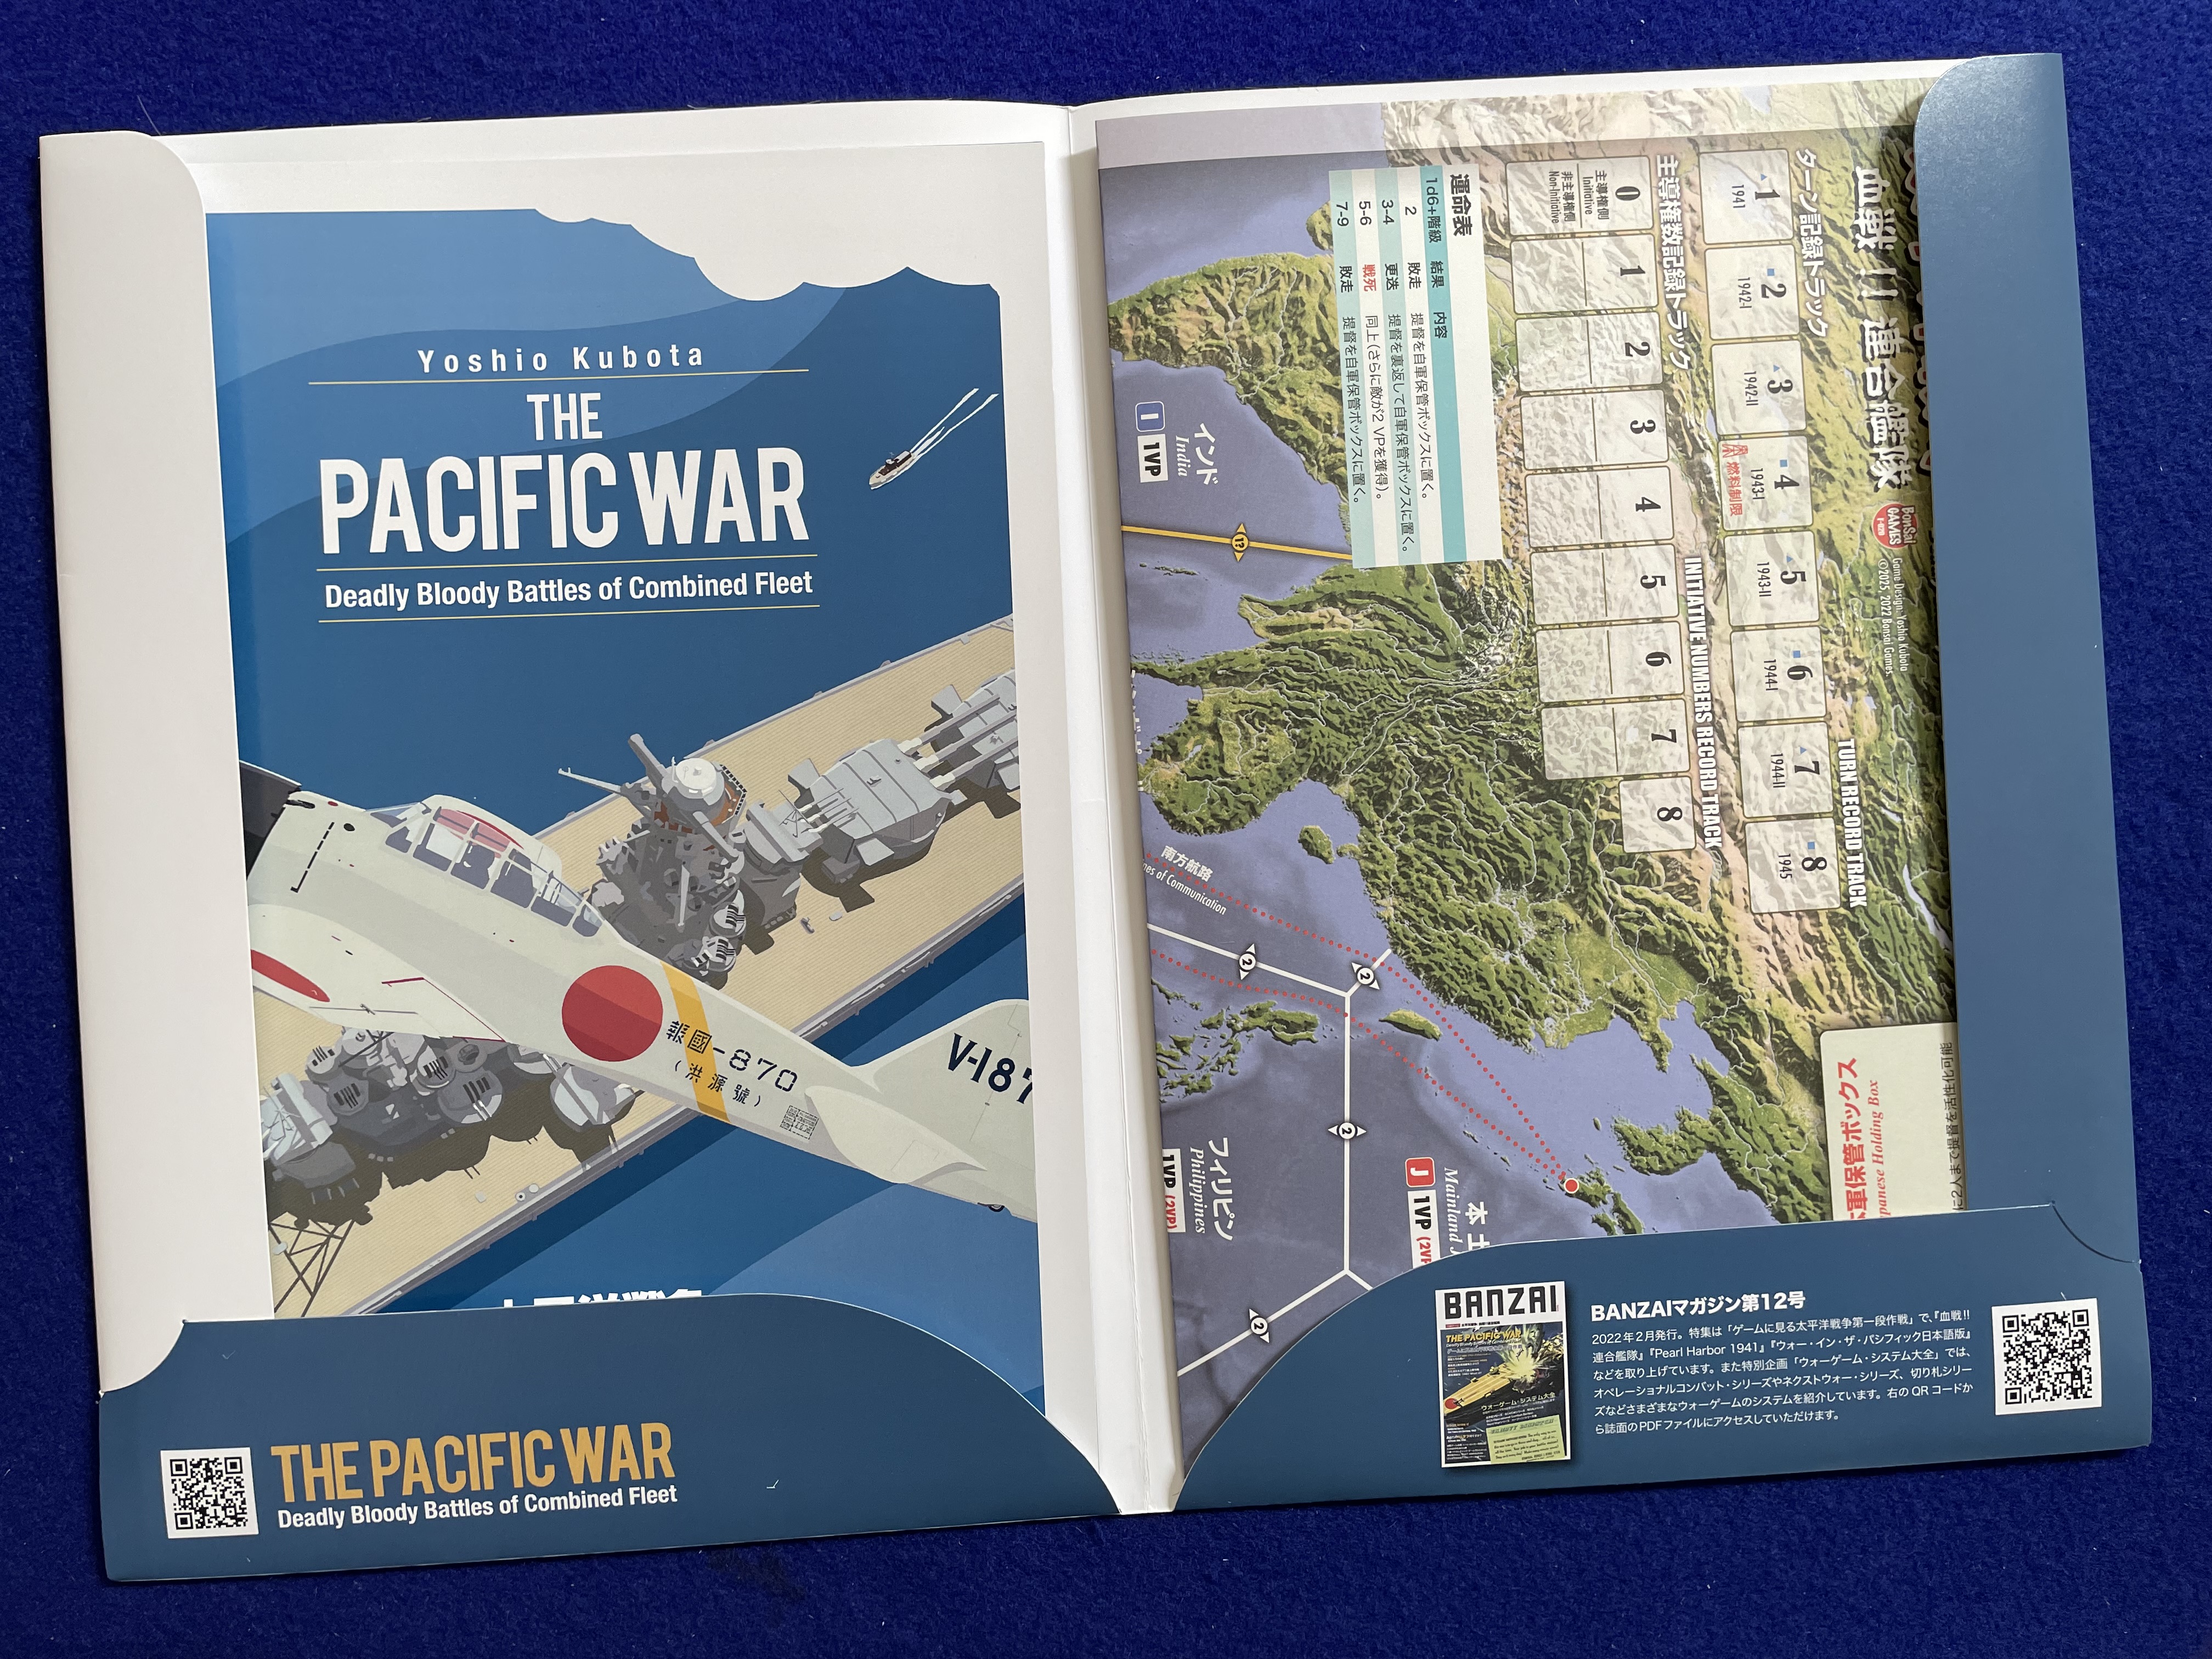

As befits a folio wargame, The Pacific War not only comes in a nice pocketed folder but also has simple components:
- Map: 1 sheet (A2 format)
- Counters: 99 15mm square pieces
- Rule book: 1 book (12 pages of A4 format)
- Player Aid: 1 sheet (A4 format) x2

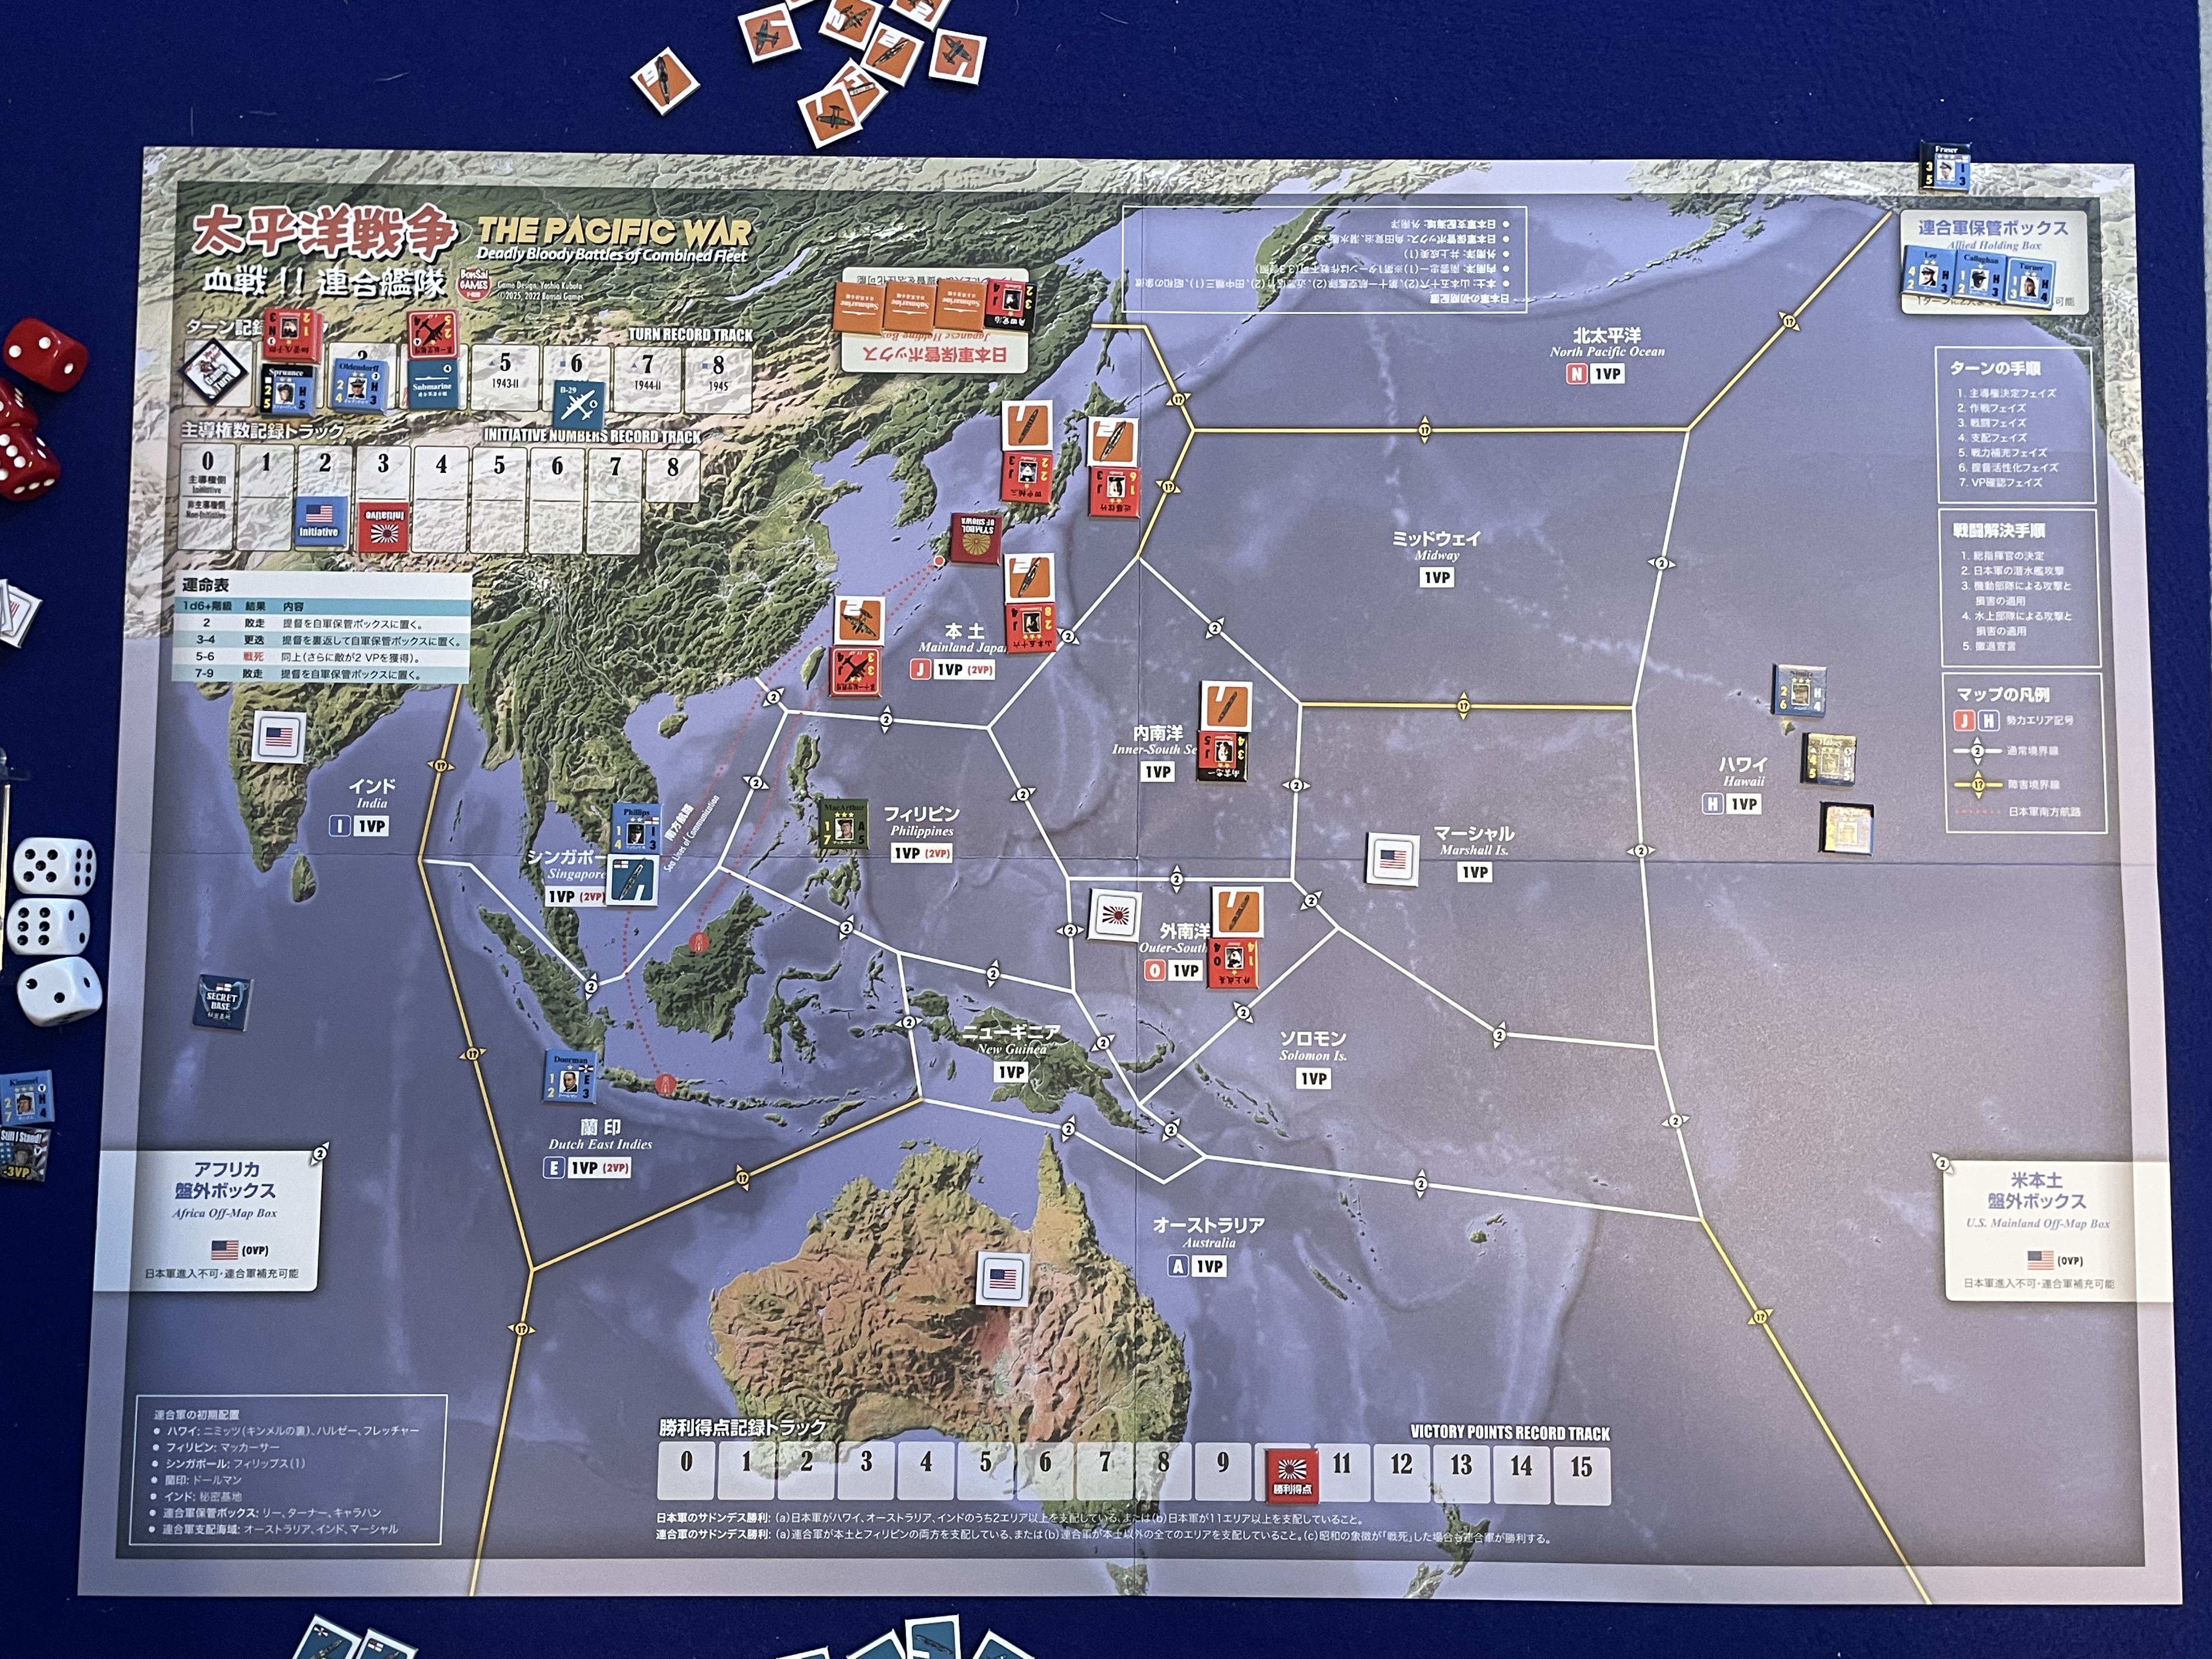
For us ‘Mericans, that ‘A2 format’ map for The Pacific War translates to roughly 23.5″ x 16.5″; this wargame fits nicely even on a small card table.

The rulebook and player aids for The Pacific War are nicely laid out and in full color. Too bad the various AI tools cannot yet do a direct text translation into that same format.

Like any wargame, “translating” the rules is always a challenge. In the case of The Pacific War not only must I understand the game system, but the rules need to be translated into English for me. Grok and ChatGPT do good work, but the hardest parts to translate is text around figures. For example, although both ChatGPT and Grok translated the text around the counter examples in the rules, both did a very poor job of keeping that text located relative to any sort of graphic reference; i.e. I had the captions but it was not clear which caption went to which part of the counter. I eventually worked it out but if there was a most frustrating moment in the translation process that was perhaps it.
The core game mechanism for The Pacific War is inspired by the game Taiheki (1990). In that game, samurai and warlords are the focus with armies built around them. In The Pacific War that same core mechanism is used but instead of samurai and warlords you have admirals and certain commands.
My Great Pacific War
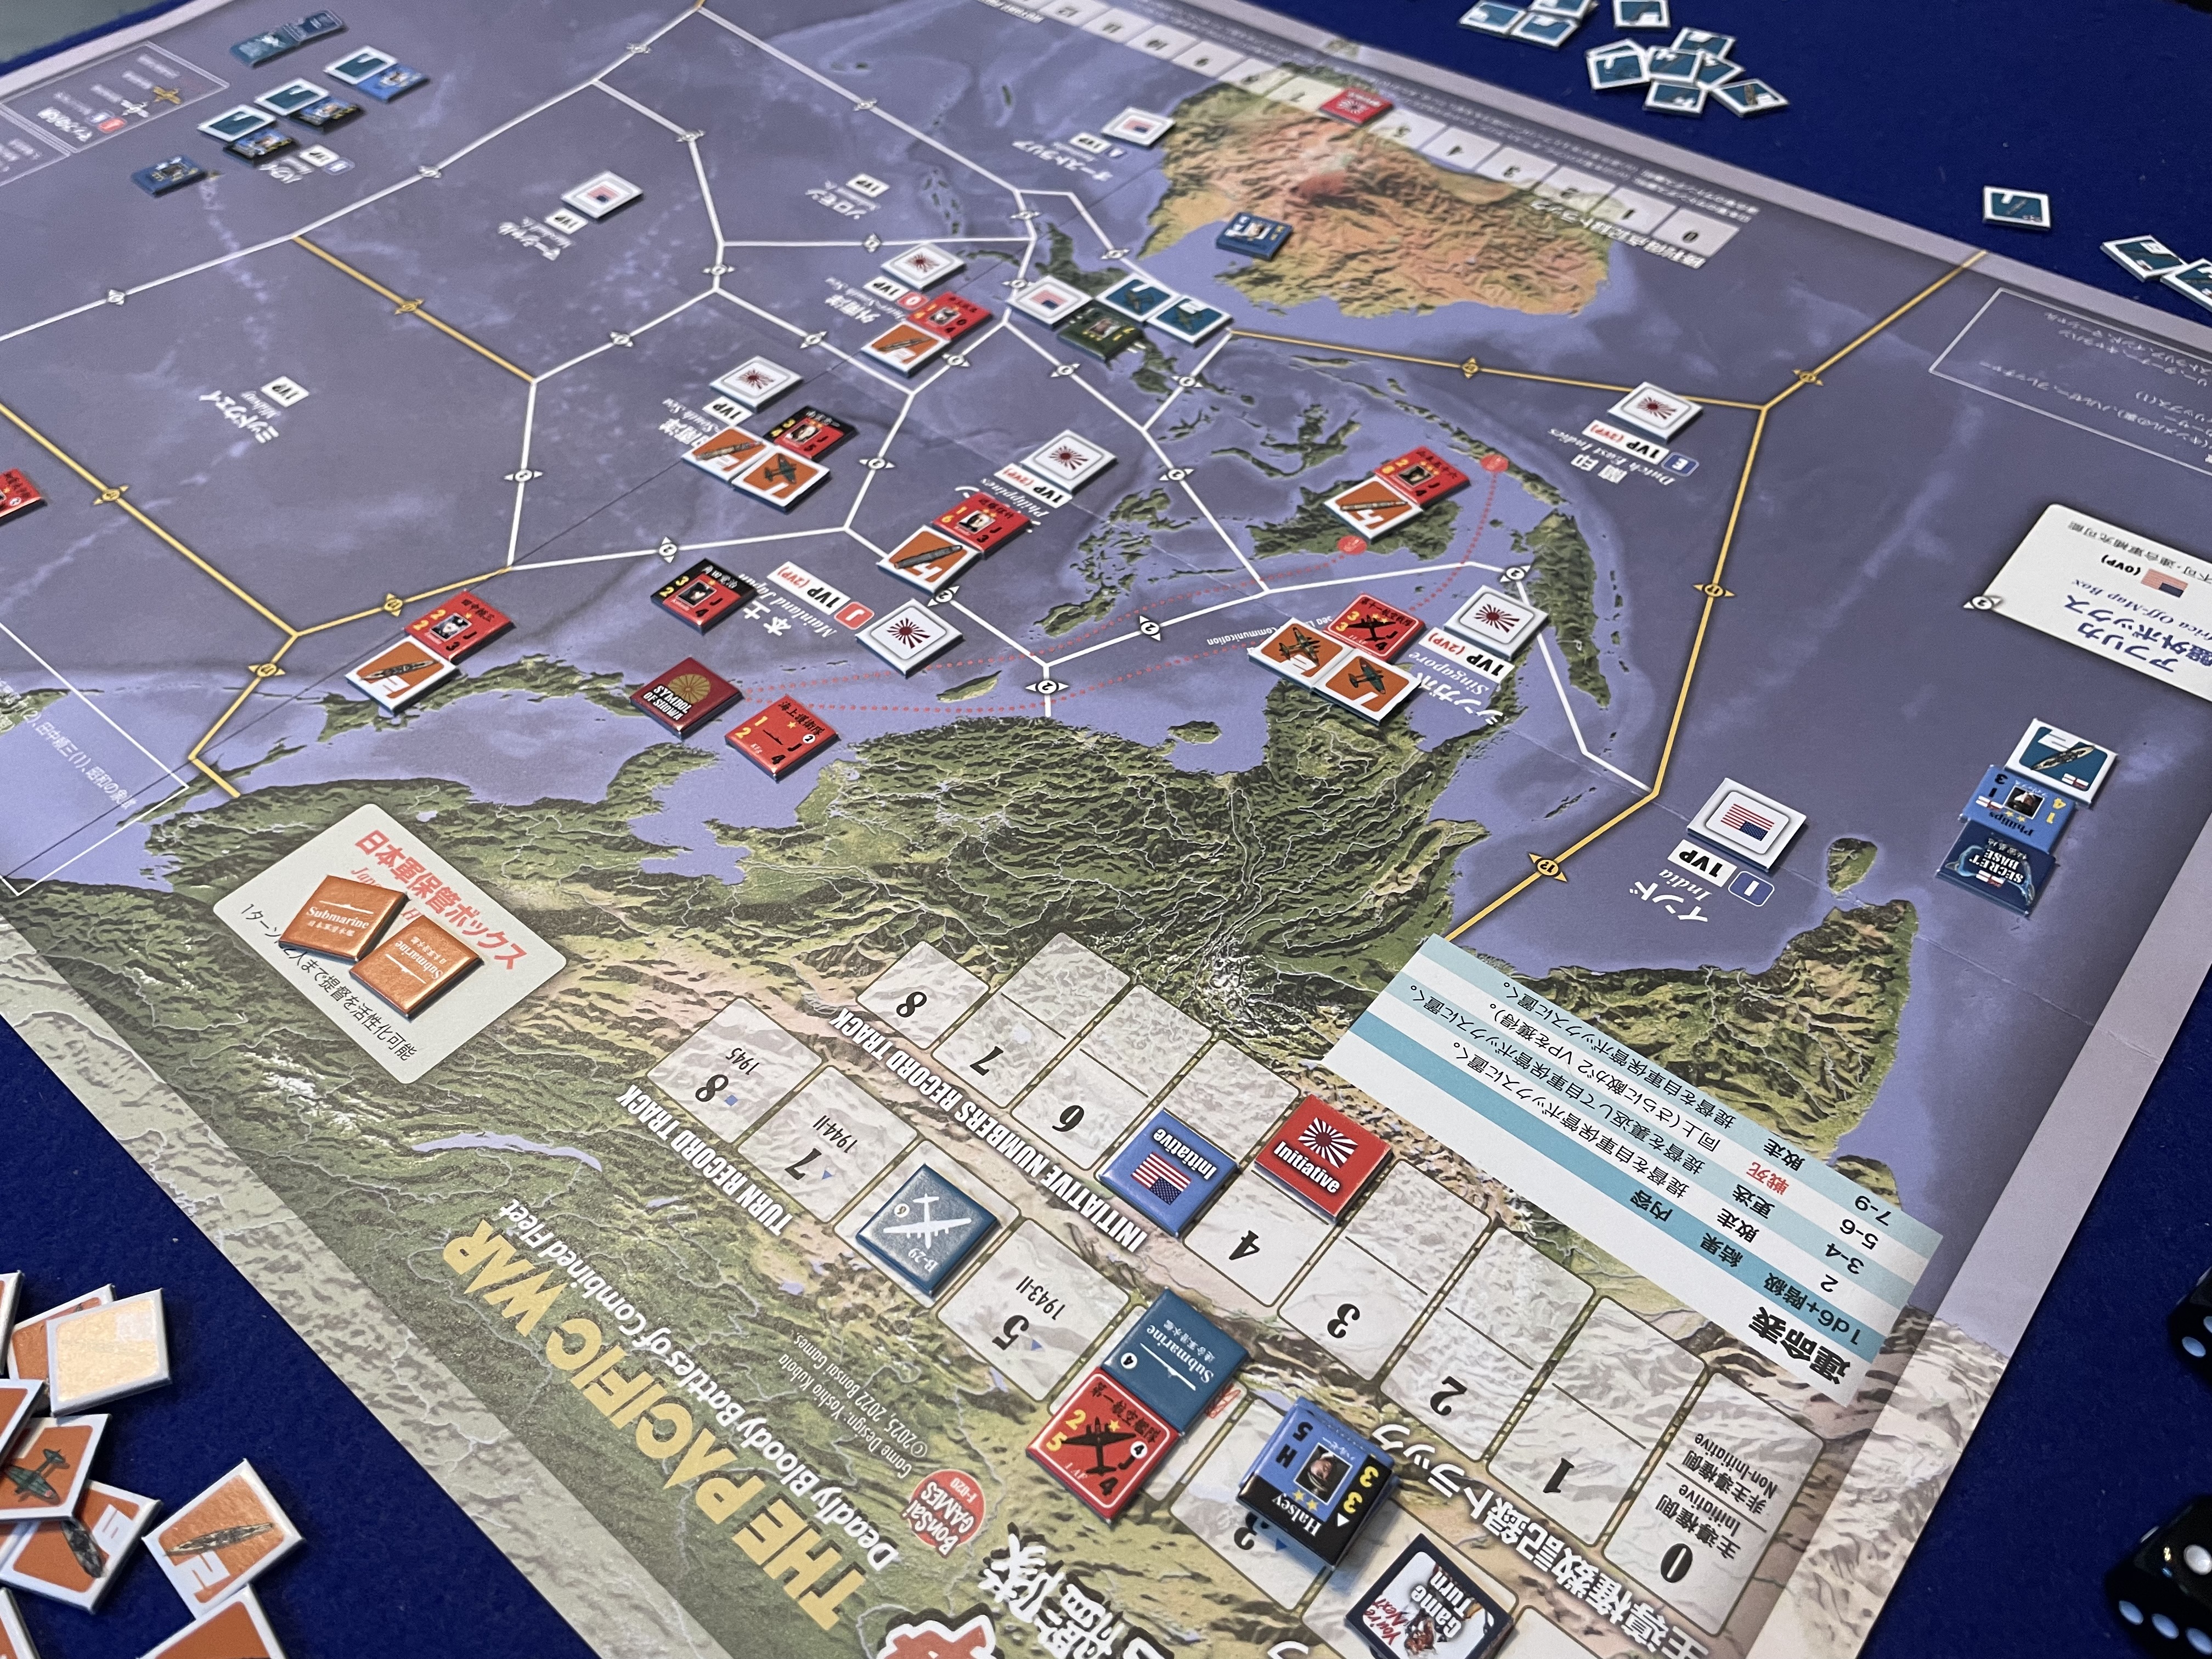
After playing a learning game I reset The Pacific War for my World War II in the Pacific. The standard scenario starts just after the raid on Pearl Harbor. On the Allied side Nimitz (with Halsey and Fletcher) has relieved Kimmel in Hawaii, MacArthur is in the Philippines, Doorman is in the Dutch East Indies, and Phillips has Force Z in Singapore. Most of the Combined Fleet led by Yamamoto is in home waters near Japan but Nagumo, returning from the raid at Pearl Harbor, is in the Inner South Sea but cannot move on Turn 1.
Every turn in The Pacific War is executed using a seven-step sequence of play. After determining (1) Initiative, players move their forces in the (2) Operations Phase by spending those Initiative Points. After Operations, the (3) Combat Phase is played followed by determining control of areas in the (4) Control Phase. The game turn winds down with a (5) Reinforcement Phase (admirals on the board) and the (6) Admiral Activation Phase where off-board admirals are brought to the map. A turn ends with a (7) Victory Point (VP) Check Phase.
Early 1942 (Turn 1)
Every game turn the players dice off for Initiative. Even this simple step uses a game mechanism that makes the other player’s roll important. In the Initiative Phase, both players roll 1d6 with a possible +1 die roll modifier (DRM) if their Commander-in-Chief admiral is in their home area. The highest roll is the winner but they get a number of Initiative Points (activations in the Operations Phase) equal to their opponent’s die roll +1. The loser gets a number of Initiative equal to their die roll.
[In my replay of The Pacific War, Nimitz spent most of the game in Hawaii while Yamamoto occupied the Dutch East Indies. Thus, the Allies usually had a +1 DRM for Initiative. Even with tht advantage there were many frustrating turns when the Allies rolled a 5 or 6 while the Japanese rolled a 1 or 2 because—though the Allies won Initiative—they only got 2 or 3 Activations against the Japanese 1 or 2. How many times have you played a wargame where you want the enemy to roll well (just not too well)?]
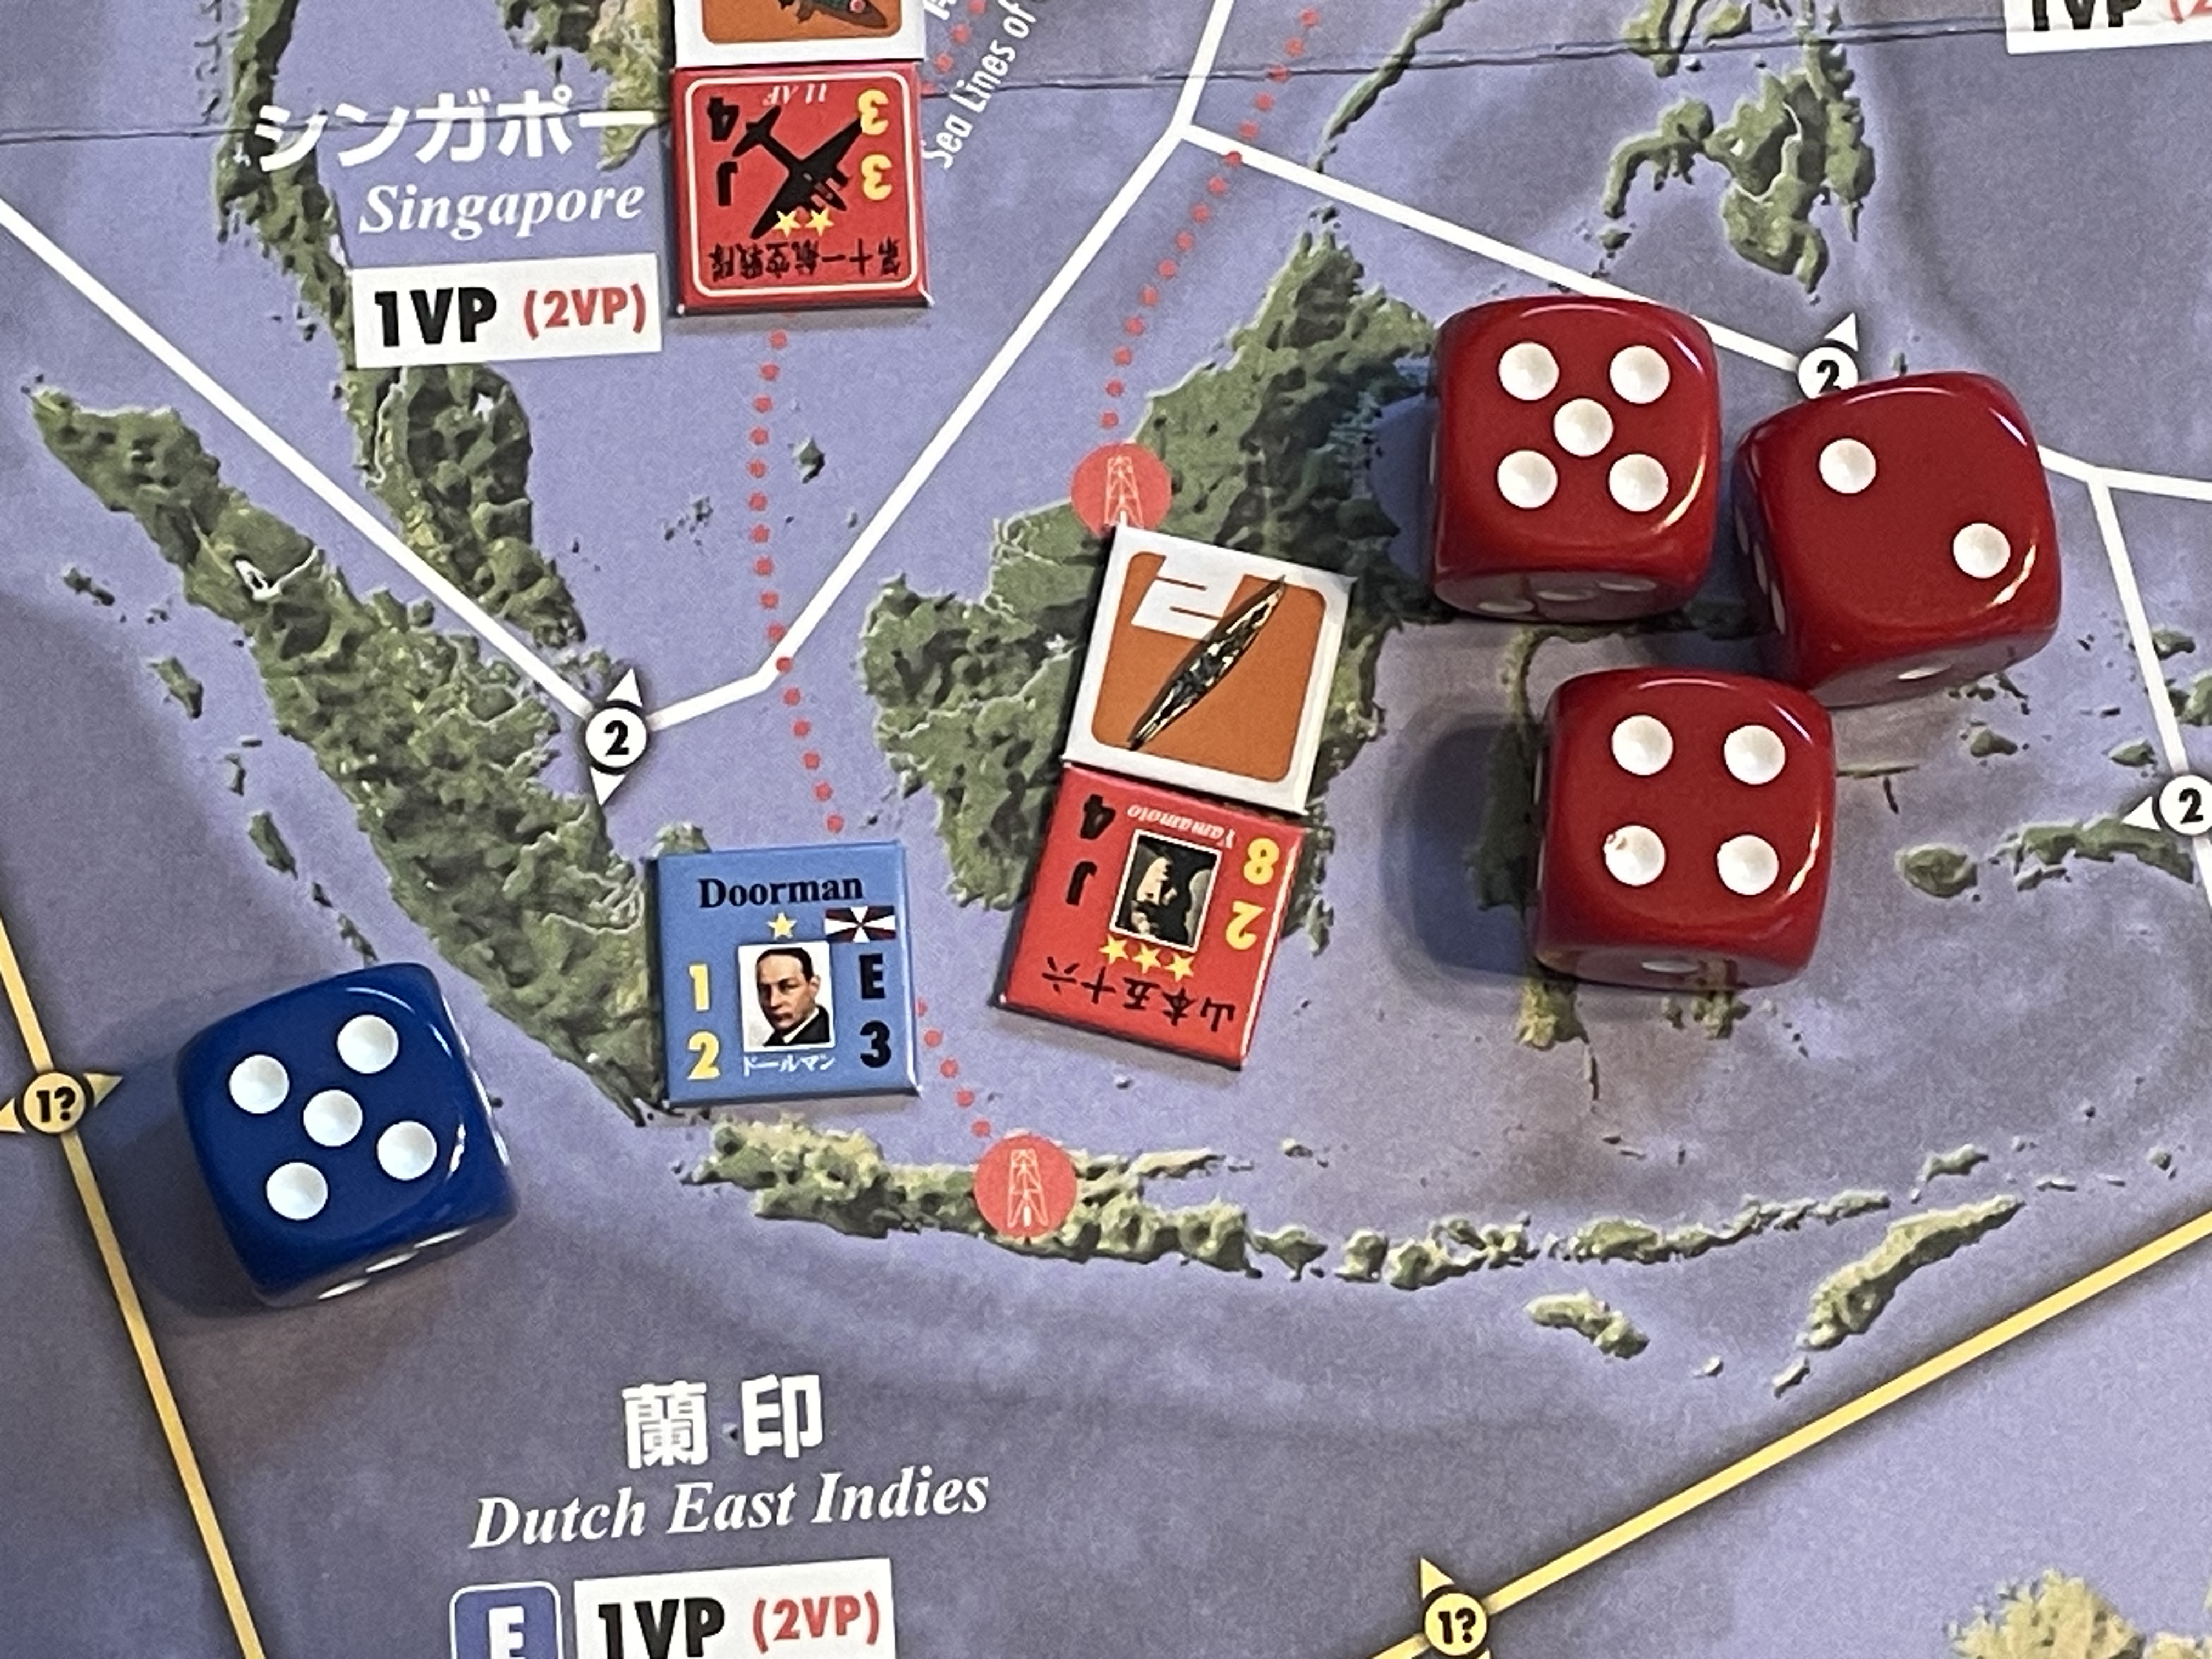
Fate of Force Z
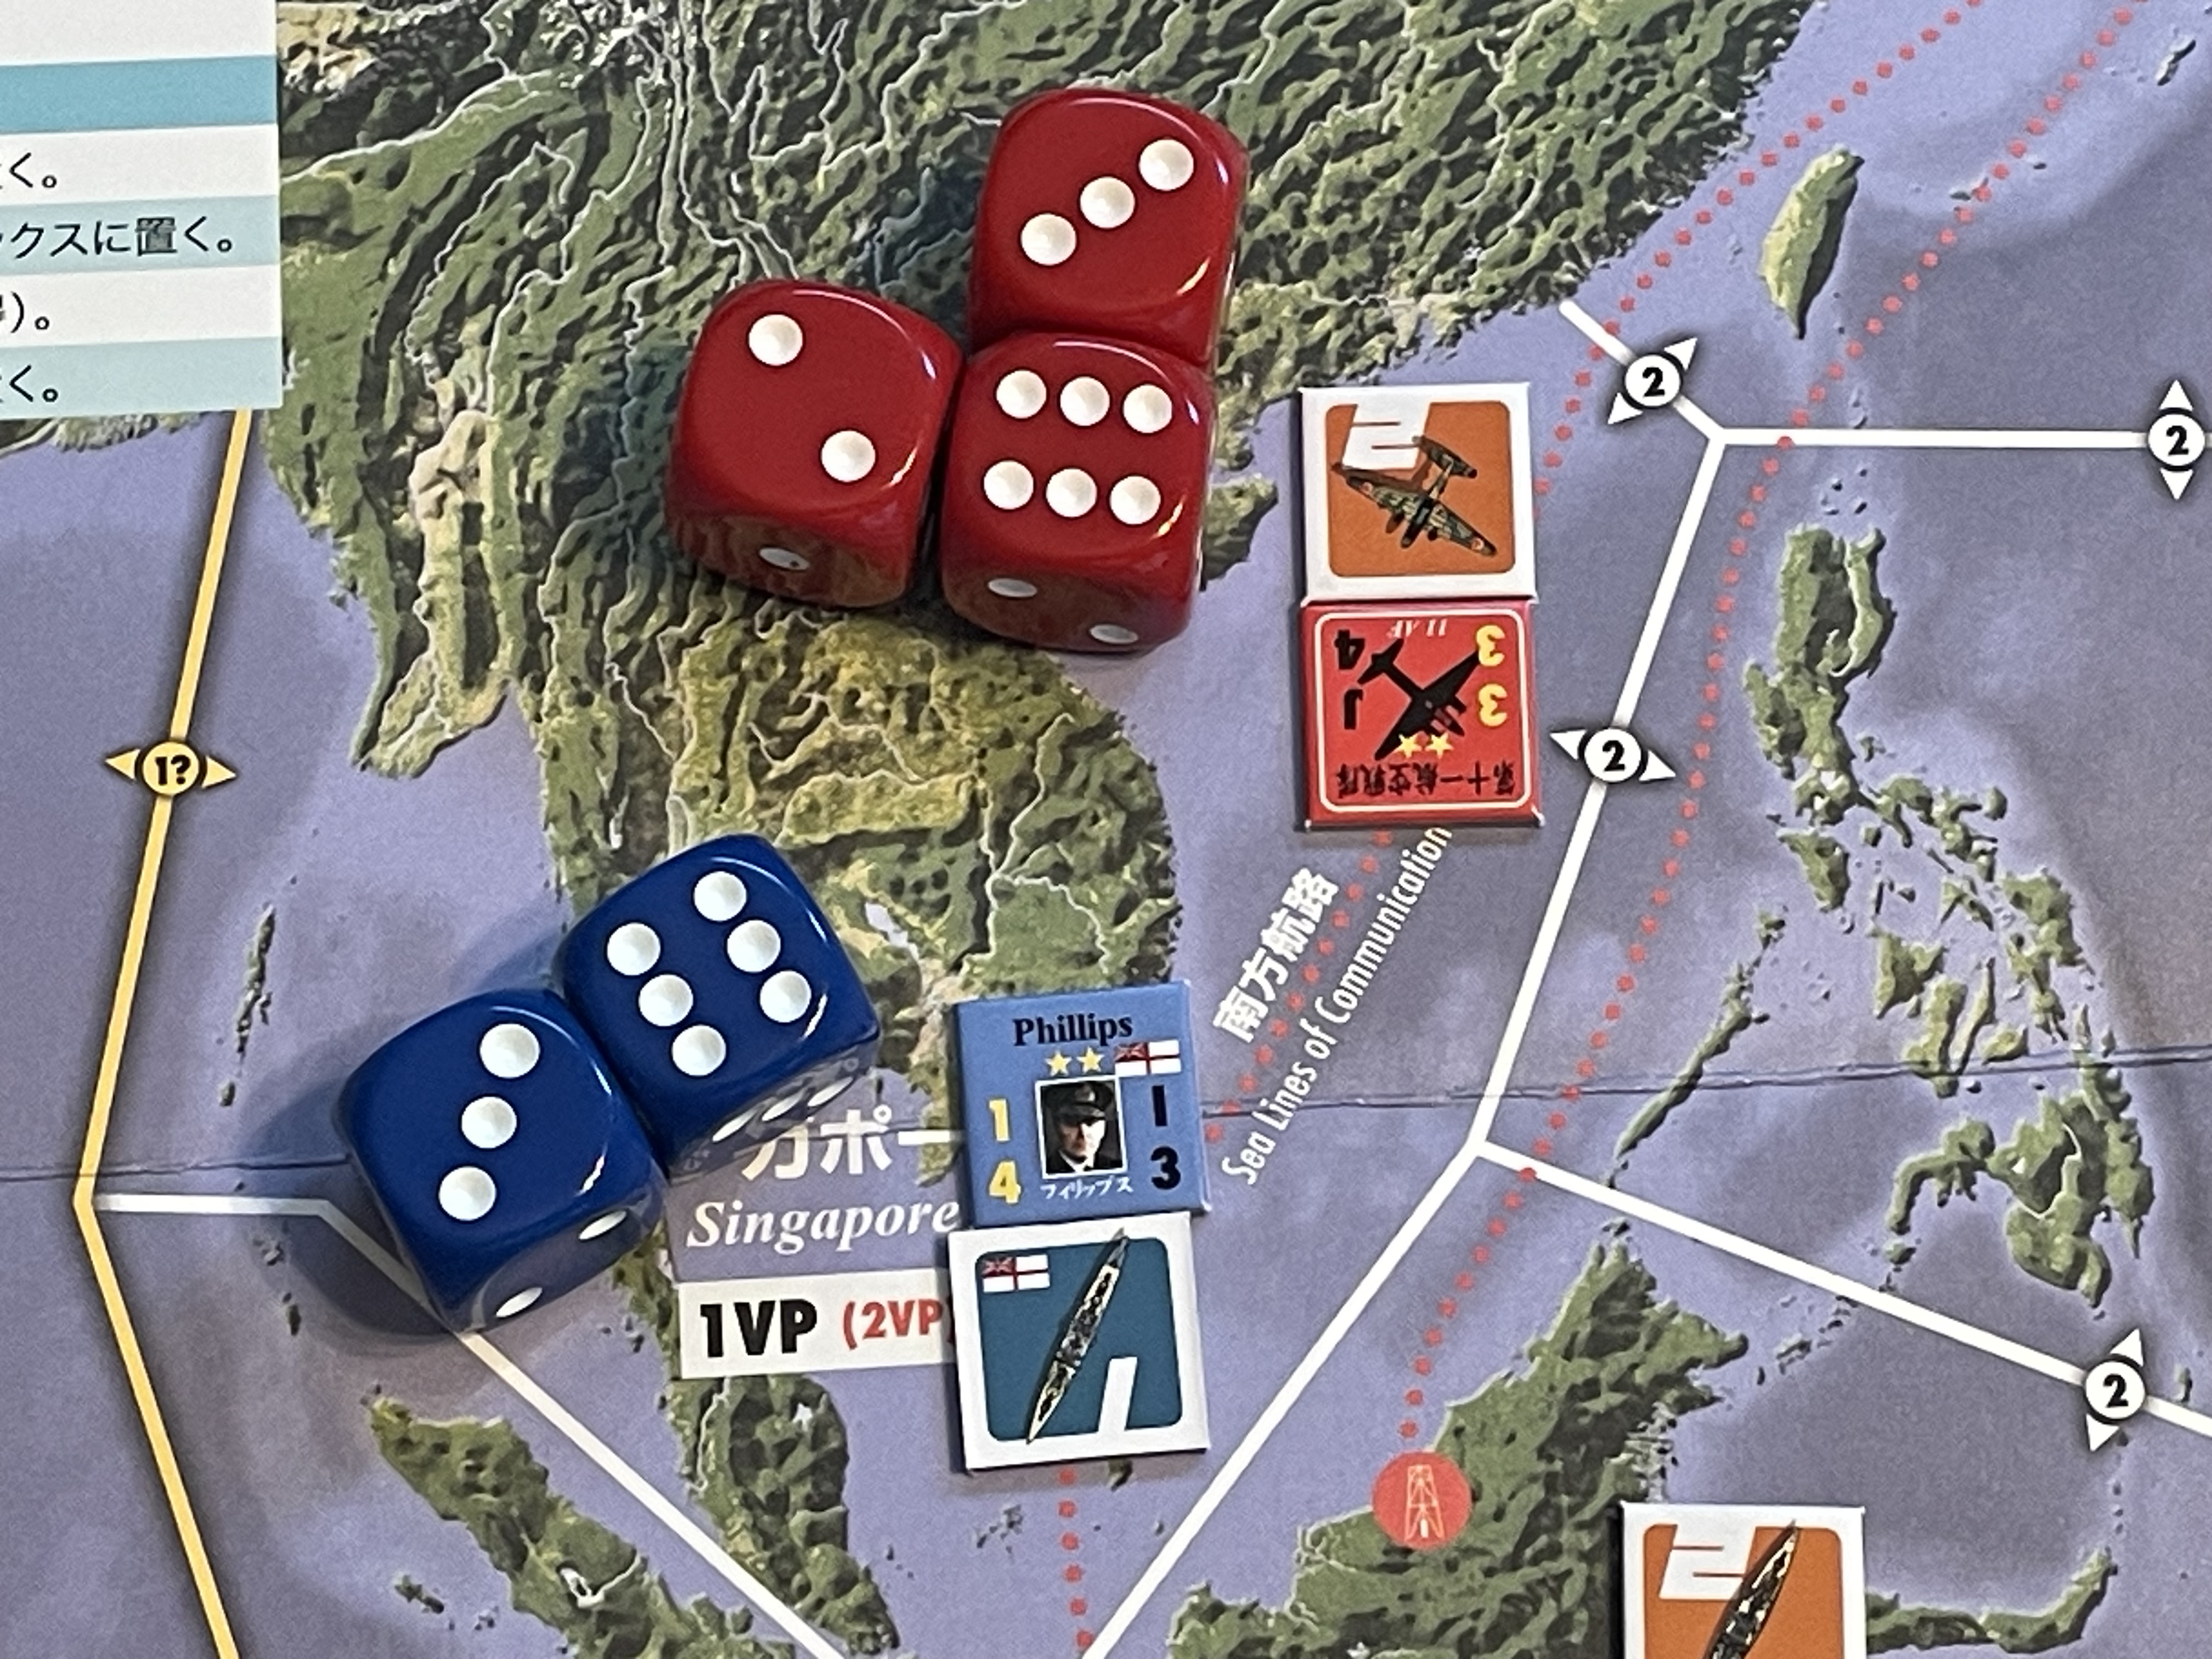

The first battle of the Combat Phase took place in the waters off Singapore pitting the 11th Air Fleet (11AF) against Force Z led by Phillips. In the first round of combat—shown on the left above—the Japanese roll 3d6 (total of # of admirals + Strength) where each roll of 4 or greater hits (the difference in Tactical Acumen is 11AF Tactical = 3, Phillips Tactical =1; more on this DRM later). The Japanese score a single hit from the [6]. Phillips rolls 2d6 (unmodified) for a single hit. Wanting to avoid death, Phillips retreats and though the Japanese get a free attack with 2d6—shown on the left above—the British admiral escapes to India.
Doormans doom

During the Operations Phase the Allied player withdrew MacArthur from the Philippines leaving the route open for Yamamoto to push as far south as the Dutch East Indies. Admiral Doorman faced off against Yamamoto by himself. It was not a fair fight (more on the details of the combat system below) and Doorman barely avoided death (Fate roll on right above where a roll of 1d6 + Rank = 5 or 6 is Death with VP to killing side); most other results are Relief where the admiral is replaced by another).
Early 1942 (Turn 2)
Late 1942 (Turn 3)

Early 1943 (Turn 4) to Early 1944 (Turn 6)
Apologies, I got so into playing The Pacific War that I rushed the photos of these turns and they turned out unusable from glare. Suffice it to say the Allies used a “Central Thrust” strategy where they built up carrier forces driving through the Marshall Islands into the Inner South Sea. The Japanese kept Yamamoto in the Dutch East Indies which froze MacArthur in Australia and Phillips in India. The problem, however, turned out to be the ability of Japan to reinforce the admirals pushed back into the Home Islands; without Yamamoto the rate of reinforcement was too slow to build up a strong response to the Allies. [In the Reinforcement Phase, the maximum number of reinforcements into a area cannot exceed the rank of the highest admiral; if the C-in-C is in their home area they can also ‘lend’ their reinforcements to other admirals as long as a supply chain of controlled areas connects them.] The Allies actually attacked the Home Islands in Early 1944 and took control. Fortunately for the Japanese, the Symbol of Showa escaped and without concurrently taking the Philippines the Allies did not meet their Sudden Death Victory Conditions…for the moment.
Kubota combat
It is in those large battles of The Pacific War where the elegance of the Taiheki-inspired combat system shines brightest. The simple five-step Combat Procedure actually has many challenging choices and nuances—focused on the admirals—which truly are the heart of the game system. Taking each step in turn…
Step 1 – Determine Overall Commander. While it might seem straight-forward to make the senior admiral the Overall Commander that may not be the best choice. Each admiral is rated for Command Ability (2-8) and Tactical Acumen (1-4). Yamamoto, with 3-Stars, is Command = 8 / Tactical = 2. Other examples are MacArthur (3-Stars / Command = 7 / Tactical = 1), Halsey (3-Stars / Command = 5 / Tactical = 4), or Mitscher (2-Stars / Command = 6 / Tactical = 2). [Keep those stats in mind as they become very important in Steps 3 & 4.]
Step 2 – Japanese Submarine Attack. Japan starts with three submarines that get free attacks against Allied admirals where a roll of [1] sinks the sub but a roll of [6] leads to an unmodified roll on the Fate Table (1 in 6 chance of death with VP). This is exactly what happened to Fletcher off Midway in 1943. [It is also in line with the historical usage of Japanese submarines that focused on scouting and sinking enemy combatants, unlike US submarines as will be shown in a later phase of a game turn.]
Step 3 – Carrier Force Attacks. If one side has a carrier admiral and the other does not the carrier force gets a free attack to start the combat rounds.
Step 4 – Surface Force Attacks. If both sides are carriers or both are surface then Steps 3 and 4 of each combat round is simultaneous. Either way both sides make their attacks. The number of dice rolled is determined by rolling the LESSER of:
- The Overall Commander’s Command Ability, or
- The sum of the number of admirals present PLUS Strength Points.
When rolling in combat, every roll of [6] is a hit. The only DRM comes from comparing the Tactical Acumen of the Overall Commanders; the admiral with the higher Tactical Acumen gets a positive DRM equal to the difference in ratings. For example, If Yamamoto and Halsey meet in battle, every roll by Halsey gains a +2 DRM meaning any roll of 4 or greater is a hit.
The combat formula in The Pacific War leads to some of the most agonizing decisions in a game. Often times, one finds that the admirals with a large Command Ability just as often lack Tactical Acumen. Take for example the following notional battle:
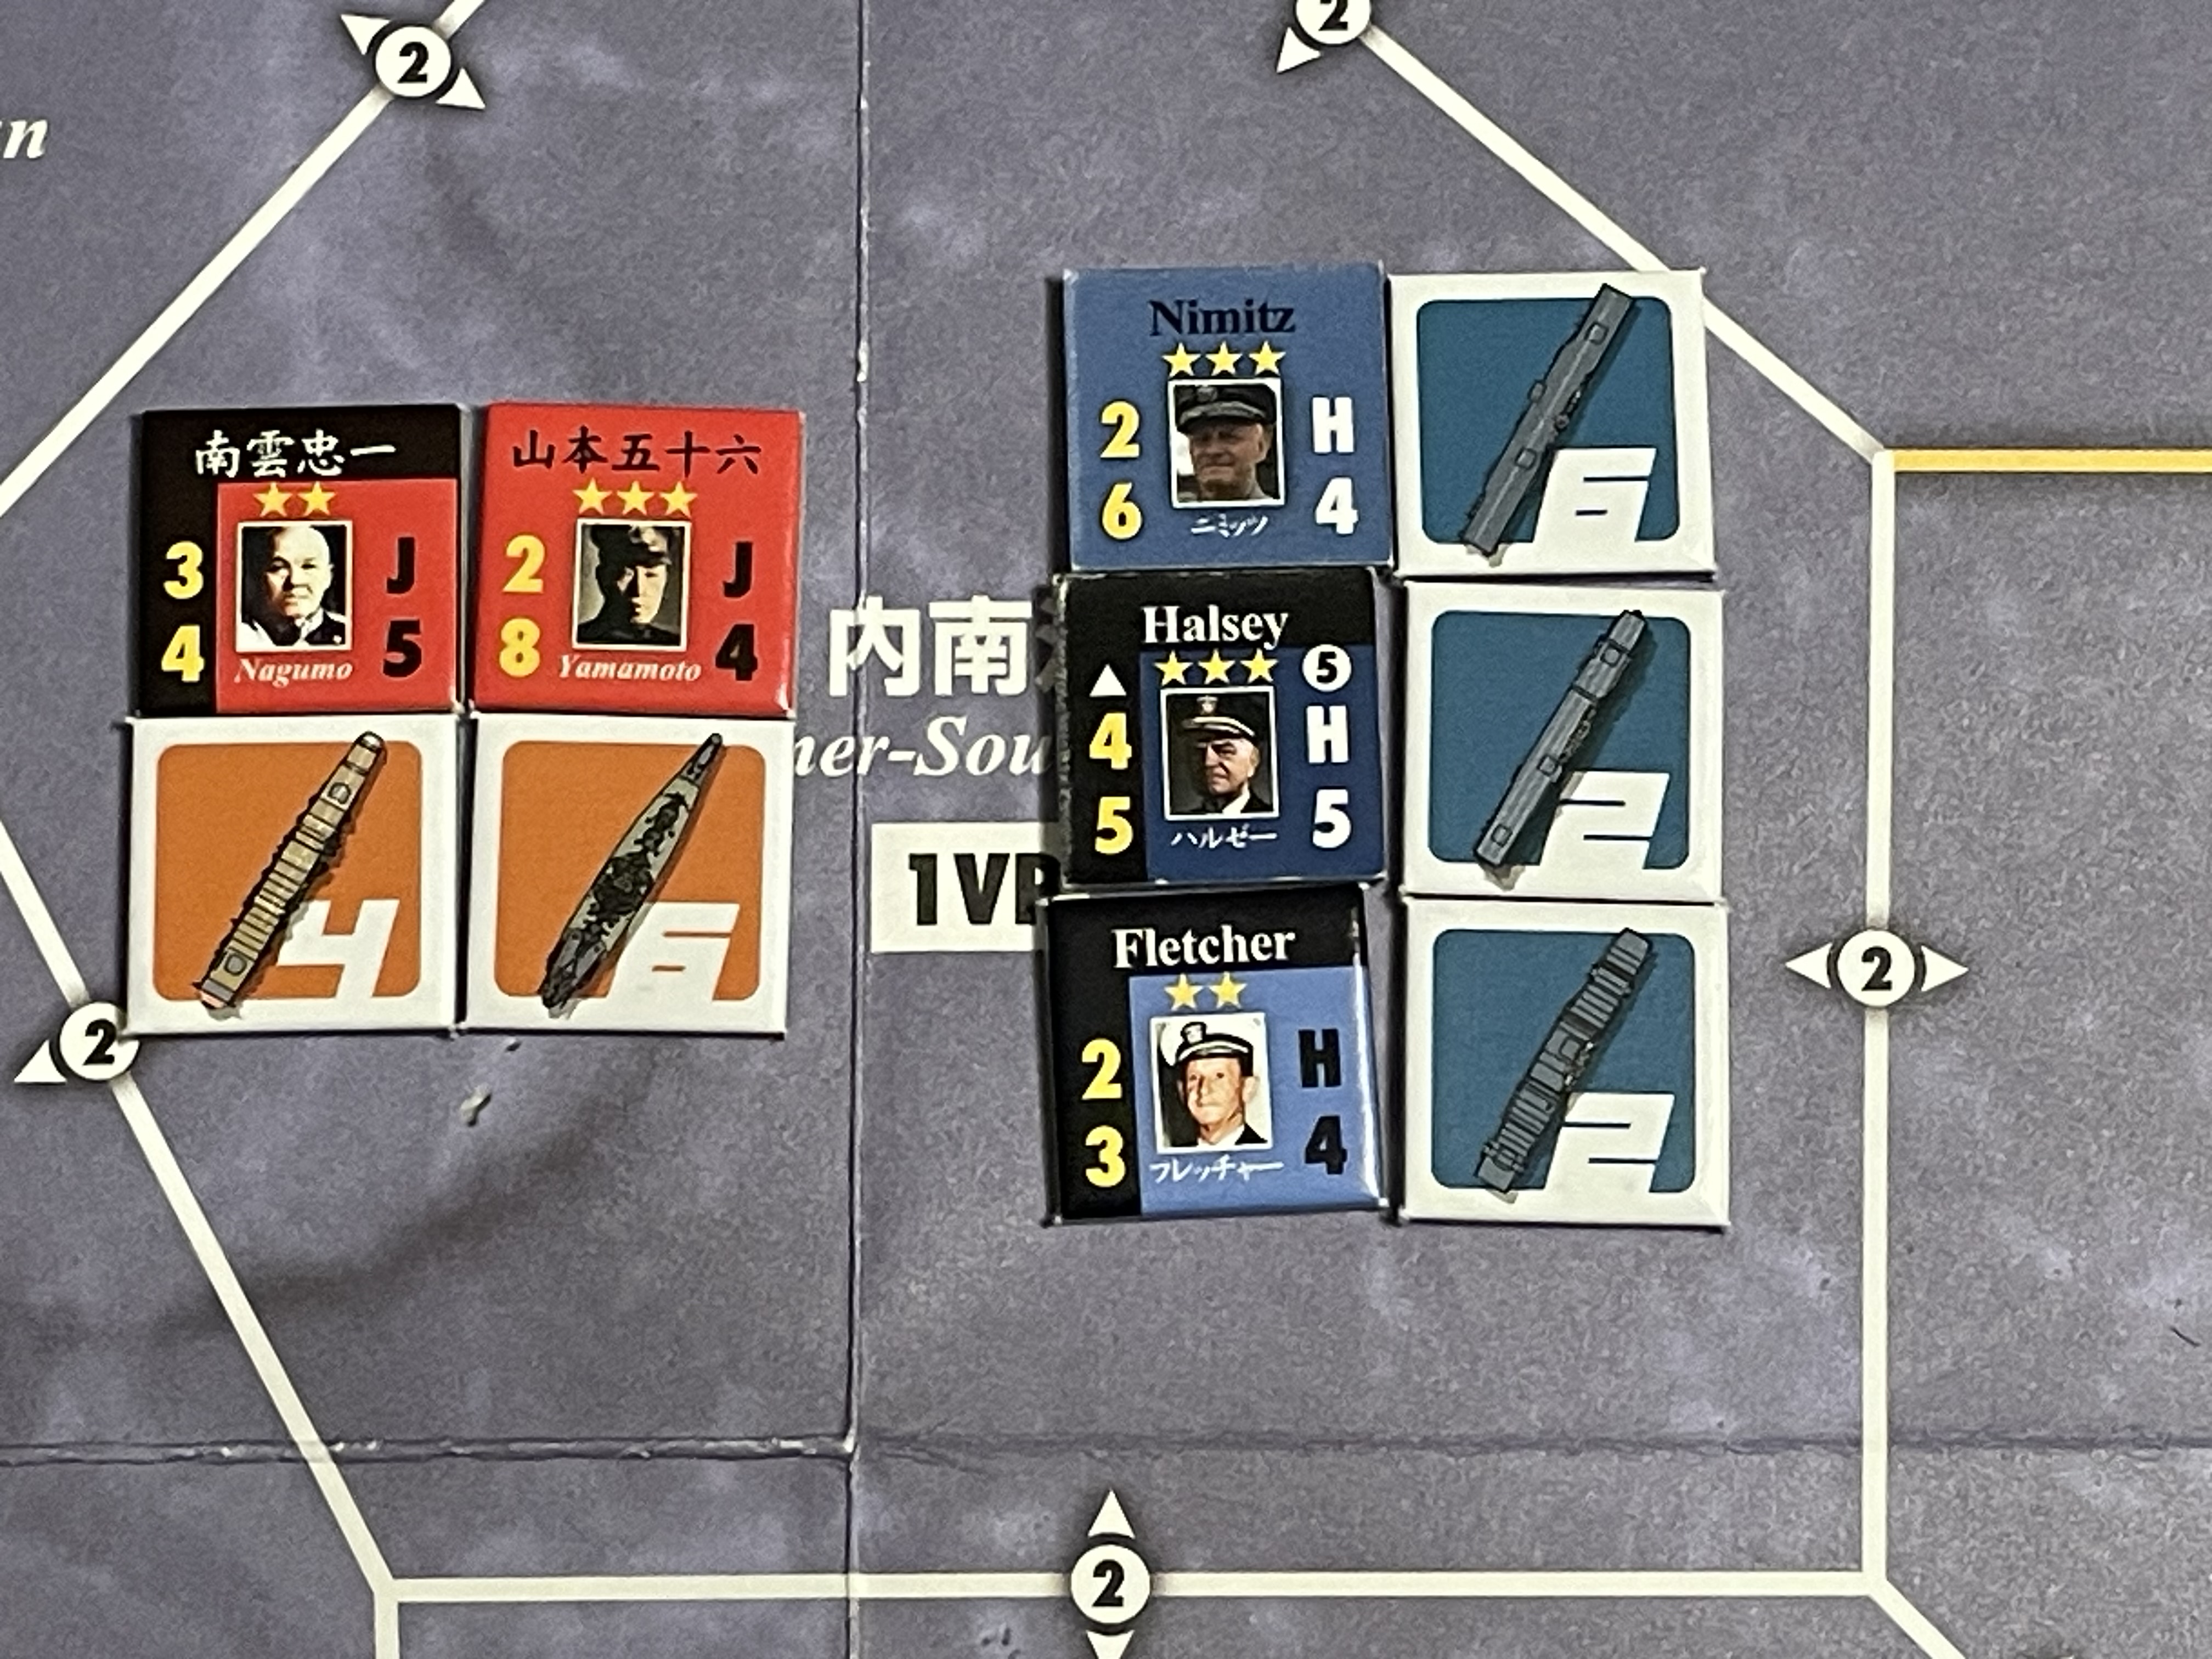
If Yamamoto is chosen as Overall Commander for the Japanese the initial combat round will roll 8d6 for the Japanese as Yamamoto’s Command Rating (8) is LESS than the sum of two admirals plus 10 Strength Points. If the Americans chose Nimitz as the Overall Commander they roll 6d6 as his Command rating of 6 is also less than 3 admirals + 10 Strength Points. The rolls for both sides are unmodified as both have Tactical Acumen 2. Simple odds tell you that Yamamoto likely have the advantage given average rolls with two additional dice. But what if Halsey was the Allied Overall Commander in this battle? The Americans would only roll 5d6 (Halsey’s Command Ability) but each roll would have a +2 DRM since Halsey’s Tactical Acumen is 4 or +2 over Yamamoto. That changes the chances of a hit from 1-in-6 to 1-in-2. Even rolling three less dice are those odds worth the risk?
Step 5 – Retreat. After one mandatory round of combat retreat is an option. If the retreating fleet is a carrier and the other is not then the retreat is automatically successful. If not, the non-retreating fleet gets to Pursue with one last free attack.
Other nice “chrome” rules in The Pacific War that add great flavor with very little rules overhead include:
- American submarines. Entering the game on Turn 4, they do not attack like Japanese submarines but in the Control Phase of a turn are placed into an area to remove Japanese control forcing a reroll. [Admirals also have a Control Value (3-5) which is the number or less on a single d6 that determines if the area occupied comes under that sides control.]
- B-29 Strategic Bombing. Beginning on Turn 6 the B-29 enters the game. If the Allies control the Inner South Sea the B-29 flies strategic bombing missions against the Home Islands and reduces reinforcement there to a single Strength Point.
- Operation Vengeance. Starting Turn 2, if Yamamoto is in an area with an Allied admiral an assassination attempt can be made. Beware, however, that if Yamamoto is assassinated the Japanese player then has access to Kamikazes which can boost an admiral’s Tactical Acumen by +3 for a combat round but at the cost of losing 3 Strength Points and 2 VP for each round used. A steep cost but sometimes worth it?
As I write my thoughts on The Pacific War it is August, meaning my play overlap the dates of the end of the war including the atomic bombings of Hiroshima and Nagasaki. Atomic weapons do not appear in The Pacific War, at least not directly. The Japanese do possess a special marker, the Symbol of Showa, which according to the rulebook represents the Emperor. The marker is placed in the Home Islands of Japan and cannot move nor does it have any affect on combat. If the Allies control the Japan area, a roll on the Fate Table is made as if an admiral was defeated in battle; if the result is “killed” then the game ends in a Sudden Death Victory for the Allies. Not an atomic bomb but a very similar outcome.
Late 1944 (Turn 7)

Slicing a bloody Orange your way
Although I love playing war-themed games, in a wargame I often judge the credibility of the design by considering the narrative the game delivers. Basically put, I prefer wargames that not only play well but also deliver a credible gaming narrative. No, I do not seek a simulation or strict re-creation of reality—but the historical outcome should be one of a range of possible outcomes. What I look for is, (1) can the wargame recreate the historical outcome, and (2) are any alternative outcomes plausible or just utterly fantastical.
In his seminal work from 1991, Edward S. Miller wrote in War Plan Orange: The U.S. Strategy to Defeat Japan, 1897-19451 of the various strategic approaches that influenced the pre-World War II development of the US war plan against Japan—War Plan Orange—over time. At its core, the primary arguments over War Plan Orange were between ‘Thrusters’ who advocated for a quick offensive and ‘Cautionaries’ who advocated an approach accepting of a longer war and not prematurely gambling the fleet (Miller, pp. 79 ,86-87).
By which route, however, was the fleet to advance? Some advocated for a Southern Thrust through the South Pacific (New Guinea to the Philippines) while others looked for a Central Thrust through the Mandates (Miller, pp. 170, 189-190). What all versions of War Plan Orange focused on was the relief of the Philippines and then (maybe) a decisive battle in the Japanese Home Islands to end the war.
Sadao Asada, in his book From Mahan to Pearl Harbor: The Imperial Japanese Navy and the United States2, helps us see the pre-war Japanese strategy:
The General Plan for Strategy, revised in 1936, emphasized the importance of quick encounter, quick showdown, and taking the initiative and the offensive. The annual operational plan (Nendo sakusen keikaku) of the same year, the oldest existing plan, provided for three stages of operations: (1) annihilate America’s Asiatic Fleet in Far Eastern waters and capture and occupy the Philippines and Guam; (2) thereby compel the American fleet to advance to the wastern Pacific; and (3) seek a decisive battle on the Bonins-Marianas line, destroying the enemy fleet.
Asada, pp. 181-182
The annual operational plan of 1941, Asado writes:
“…remained essentially the same: ‘First annihilate the enemy fleet [the Asiatic Fleet] in the Far East and control the Far Eastern seas, then, in cooperation with the army capture the enemy bases and occupy Guam and other enemy air bases. As to the main fleet of the United States, scout it and attack in the Hawaii area or enemy homeland, and when it stages transpacific passage, gradually reduce it on its passage, intercepting and annihilating it.
Asado, p. 182
The Pacific War allows players to explore these broad strategic challenges themselves and see what answer they come up with. Both strategies postulated a limited war; both strategies were unsure as to the impact of carrier air power. Those questions and others (but not too many) are posed to the players in The Pacific War. All in a wargame playable on a card table in just a few hours time.
BoardGameGeek says play time for The Pacific War is up to 180 minutes but with a bit of rules familiarity a campaign likely can be played in about 2 hours. If players tire of the standard scenario, The Pacific War has an alternate scenario called “Kimmel’s Pacific War” where Japan does not attack Pearl Harbor on Turn 1 and MacArthur valiantly (vaingloriously?) holds out in the Philippines demanding an early counterattack by the Allies to relieve him.
End game in The Pacific War
For a wargame that covers the entire span of the naval war in the Pacific theater of World War II, The Pacific War plays fast in a small footprint while delivering an epic narrative. The small frootprint and relatively rapid gameplay make this title an ideal candidate for gaming convention play. [Hmm…the upcoming Armchair Dragoons Fall Assembly is looking for events.] The Teihaki-inspired core game system, focused on admirals, creates rich decision space in most every phase of a turn. Granted, combat may at some points feel like a dice-chucking Yahtzee game but even then the number of dice thrown by the players is their decision based on who is appointed the Overall Commander in the battle. That is the true elegance of The Pacific War: a small wargame that uses a combination of game mechanisms in simple rules that empowers player to make relevant decisions driving an epic story. With The Pacific War, Bonsai Games proves the old adage, “good things come in small packages” to be true even for wargames.
- Miller, Edward S. (1991) War Plan Orange: The U.S. Strategy to Defeat Japan, 1897-1945. Annapolis: Naval Institute Press. ↩︎
- Asada, Sadao (2006) From Mahan to Pearl Harbor: The Imperial Japanese Navy and the United States. Annapolis: Naval Institute Press. ↩︎
Feature image courtesy RMN
The opinions and views expressed in this blog are those of the author alone and are presented in a personal capacity. They do not necessarily represent the views of U.S. Navy or any other U.S. government Department, Service, Agency, Office, or employer.
RockyMountainNavy.com © 2007-2025 by Ian B is licensed under CC BY-SA 4.0

2 thoughts on “Wargame SITREP 25-31 ~ Quick and bloody deadly in The Pacific War: Deadly Bloody Battles of Combined Fleet (Yoshio Kubota, Bonsai Games, 2025)”